Monday, December 13, 2021

Christmas Countdown - Cheesy Christmas Tree Bread

Ok, to be honest I hadn't planned to do food again so soon . . . but I ran across this while I was searching online for some January card class inspiration.  My mouth started watering as soon as I saw this photo, so I just had to share!

Click on photo for closer look.
Warning, if you're not drooling now,
you will be when you see the closeup view!

This beautiful and tasty Christmas Tree starts with refrigerated pizza dough from your grocery store!  It's easy-peasy and a wonderful addition to your holiday table!  Serve with marinara or pizza sauce for dipping.

Visit Cheesy Christmas Tree Bread from pizza dough - A Gouda Life for the recipe and all the details.

This is definitely on my list for Christmastime football viewing!  But now I need to go find something to eat!

Cathy  ;D

Sunday, December 12, 2021

Christmas Countdown - Candy Cane Caprese Board

OOOOOHHHHH . . . doesn't this look yummy?!  And so festive!  A great addition to your Christmas spread.
Click on image for closer look.

Many thanks to Lori Lange for posting this yummy idea!  Visit Candy Cane Caprese Board - Recipe Girl® for all the details and a video showing ingredients and how-tos.

Cathy  ;D


Christmas Countdown - Peaceful Cabin Card

This is such a beautiful, peaceful scene!  This card has been made in several of my classes over the last month-ish, using stamp sets and dies from the July-December 2021 Mini Catalog. **

Click on photo for closer look.

Thanks to my friend Kathy Howes for sharing this card.  You can view Kathy's video tutorial at Peaceful Cabin bundle swap card - YouTube.  While you're there, check out Kathy's other video tutorials -- she's got a TON of them at be creative with kathy - YouTube.   All are educational and fun!

There are only a couple of differences between Kathy's card and mine, and those are the sentiments on the front and the inside.

Front sentiment:  Whimsical Trees stamp set
Inside sentiment:  Heartfelt Wishes

Inside

Cathy  ;D

** NOTE:  Unfortunately, the Peaceful Cabin stamp set used for the fence and fox on this card and the Peaceful Place Designer Series Paper were unavailable as of the date of this post (December 12).


Christmas Countdown - Simply Elegant Seasonal Card

Often, when I hit a brick wall, I visit Becky Stoddart's blog, Scrappin' and Stampin' in GJ (scrappinandstampiningj.blogspot.com), for inspiration.  Becky sometimes posts more complicated or detailed cards, but most of her designs (she admits many of them are CASEd) are simple and elegant like this one.

Click on image for closer look.

Becky lives on the Western Slope of Colorado and may or may not be a Stampin' Up! demonstrator -- if she is, she doesn't advertise it on her blog, but she does use a LOT of Stampin' Up! products to create her cards.

To make this card, Becky used Night of Navy and White card stock, VersaMark ink and white embossing powder for the snowflakes, Night of Navy ink for the sentiment and the sponging, the Christmas Trees (156330) and Stitched So Sweetly (151690) die sets, and a bit of white ribbon.  This picture was posted on her blog December 10, 2021, along with a brief description of how it was made.

Although I have seen many cards using the Stitched So Sweetly dies, this is the first one I've seen that actually has me teetering on the edge of buying the set.  Hope you enjoy it too!

Cathy  ;D


Christmas Countdown - Snowman Reverse Easel Card

Seems like I'm forever catching up . . . this time it's because I was under the weather Friday p.m. and Saturday a.m.  So today I'm bringing you several cards that I found online, beginning with this super cute snowman easel card.

Click on image for closer look.

This design is from Vickie Littlewood, a Stampin' Up! demonstrator in the UK.  Visit Vickie Lou Designs: Snowman Season Merry Christmas Reverse Easel Greeting Card. Stamp n Hop December 2021 Blog hop for all the details!

Hope you enjoy this card . . . I think I'll try it myself when I'm back to creating in my craft room tomorrow!

Cathy  ;D
 

Thursday, December 9, 2021

Christmas Countdown - Turmeric Chai Latte

 Tonight I'm chillin' -- watching football and enjoying my Turmeric Chai Latte!


Turmeric purportedly is great for whole body health support.  Turmeric, and more specifically curcumin, which is found in turmeric, is said to boost the immune system, help reduce joint pain by reducing inflammation, and support brain and cardiovascular health!  Is this true?  Well, I'm no expert, but I can tell you that my Turmeric Chai Latte is quite tasty, so if all those things are true, they're like frosting on the cake!

What's in the mug?

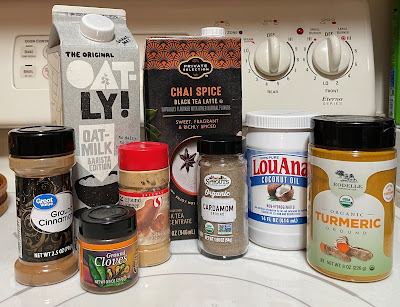
3/4 cup Oat Milk
3/4 cup Chai Spice Black Tea
   Concentrate
3/4 tsp. ground turmeric
1/2 tsp. ground ginger
1/4 tsp. ground cinnamon
pinch of ground cloves
pinch of ground cardamom
1/8 tsp. black pepper
1/2 Tbsp. coconut oil
1/2 Tbsp. maple syrup
Mix first two ingredients in a small saucepan over low heat. Stir in spices and bring the mixture to a simmer, but do not boil. Allow to simmer 5-10 minutes, whisking occasionally, until smooth and hot.

Remove from heat; stir in coconut oil and maple syrup.

If desired, froth latte with electric frother.

Enjoy!


Time-saving tip:  Instead of measuring out all of the ingredients each time you make this, pre-make several packets of the dry ingredients to have on hand whenever you're ready for a cuppa!

Cathy ;D

Wednesday, December 8, 2021

Christmas Countdown - A Trio of Gift Tags

 This trio of sweet tags will brighten any holiday package!

Click on image for closer look.

These tags were quick and easy to make using some Stampin' Up! punches and a bit of card stock and patterned paper!

Materials

For all tags
* Crumb Cake card stock: 4-1/4" x 2" for tag base
* Delightful Tag Topper Punch
* White card stock: 3-1/4" x 1-1/2" for sentiments and "To/From" pieces on back **
* Kraft twine from my stash: about 12" for hanging string

Additional materials for Snowman tag
* Snowman Builder Punch
* Scraps for punch:
   * Shimmery White card stock (snowman)
   * Black card stock (hat)
   * Pumpkin Pie card stock (nose)
   * Soft Suede card stock (arms)
* Starform Black Glitter Stickers from my stash (eyes and buttons)
* Iridescent Starform Glitter Stickers from my stash

Additional materials for Candy Cane tag
* Candy Cane Builder Punch (retired)
* Red and White Striped patterned paper from my stash (candy cane)
* Real Red card stock (bow)
* Wink of Stella Glitter Brush (bow)
* Red Starform Glitter Stickers from my stash

Additional materials for Tree tag
* Pine Tree Punch
* Green and White patterned paper from my stash (tree)
* Iridescent Starform Glitter Stickers from my stash
* Clear Star Rhinestone from my stash

The back piece is the same for all tag designs.

Oh, what fun!

Cathy  ;D

Additional note:  
** All sentiments for these tags were created with Word and printed on 8-1/2" x 11" white card stock, and then trimmed to 3-1/4" x 1-1/2".  The corners were then trimmed with a fun little corner punch from my stash.


Tuesday, December 7, 2021

Christmas Countdown - Super Cute Reindeer Card

Rudolph, the Red-Nosed Reindeer . . . 

This was the most fun card to make!  Thanks to Roslyn Archer for sharing this idea.  To view Roslyn's original card, visit her Facebook page at Stampin with Ros | Facebook.

Click on image for closer look.

Materials
* Christmas to Remember stamp set ***
* Black ink
* Clear Embossing Powder
* Basic Black card stock (8-1/2" x 5-1/2", scored at 4-1/4" to create card base; about 3-1/2" x 3-1/2" for scalloped circle; scraps for antlers)
* Real Red card stock (5-1/4" x 4")
* Peaceful Prints Designer Series Paper (5" x 3-3/4" reindeer background paper on front; 5-1/4" x 4" buffalo check design for mat on inside; scrap of buffalo check design for reindeer punch) **
* Be Dazzling 6" x 6" Specialty Paper (2" x 3-3/4") **
* White card stock (about 3-1/2" x 3-1/2" for circle; 5" x 3-3/4" for inside)
* Deer Builder Punch ***
* Layering Circles Dies (retired)
* Winter Snow Embossing Folder (retired) ****
* Tiny Red Starform Glitter Sticker for nose

Inside

I hope you enjoy this bright and cheery design!

Cathy  ;D

Additional notes:
** Designer Papers were free items in the August-September 2021 Sale-a-Bration brochure.
*** Stamp set and punch are featured in July-December 2021 Mini Catalog; both are being carried over and will be available thru June 2022.
**** This photo doesn't show it, but on the final version of this card the white circle on card front was embossed with snowflakes.  The photo shown here is my prototype, and unfortunately (or fortunately, depending on how you look at it), all of my cards were used in classes or sold before I could take another photo.

Monday, December 6, 2021

Christmas Countdown - Snow Place Double-Z Side Pull Card

Wow, stampers!  I can't believe I haven't shared this card design with you yet!  This card was made earlier this year in both my July 2021 Zoom class and my September class at The Craft Box.  Guess I was saving it for my Christmas Countdown.

Click on photo for closer look.

This is the coolest thing ever -- a double-z fold card made from one piece of card stock!  Thanks to Stampin' Up! Demonstrator Angie Leach for the idea.  View Angie's original design at Too Cool Stamping: December 2015 (you'll need to scroll down a bit to find it) along with complete instructions and cutting layout.

The original card was made using the Snow Place stamp set.  My card was made with the Snow Wonder stamp set.  The materials list for my version appears below.

Stampin' Up! Products
Snow Wonder stamp set and Snow Time Dies (snowman and trees)**
Sentiment stamp from my stash***
Basic Gray Classic Stampin' Pad (tree images)
Black Ink (snowman image and sentiment)
Paper:
* Night of Navy card stock (5-1/2" x 4-1/4" for card base; 2-7/8" x 2-3/4" and 5" x 3/4" to mat Designer Series Paper)
* Misty Moonlight card stock (9-3/4" x 4")
* White card stock (4-1/4" x 2-7/8" for inside; scraps for trees)
* Feels Like Frost 6" x 6" Designer Series Paper (retired) (2-3/4" x 2-5/8" and 4-7/8" x 5/8" for card front)

I hope you follow the link above to get instructions and try this card design.****  Once you get the cutting layout down, this will be the only Z-fold card you will ever want to make again!

Cathy  ;D

Additional notes:
** Snow Wonder stamp set and Snow Time Dies are currently on the Last Chance List and will retire January 3, 2022, or when supplies are depleted.  (When I checked this morning -- 12/6/2021 -- both items were still available, and the dies were marked 20% off the catalog price.)
*** Sentiment is from Chilled Out stamp set by C.C. Designs.
**** Contact me if you have problems finding the online instructions.


Christmas Countdown - Advice from a Snowman


Sharing my December computer background this morning.  Will have a new holiday project for you this afternoon.

Cathy ;D

Sunday, December 5, 2021

Countdown to Christmas 2021 . . . beginning a little late . . . .

Hey, folks!  Here it is December 5, 2021, and I am just now finding the time to begin my Countdown to Christmas!  So for the first few posts, I'm cheating a little and finding online ideas to get this show on the road . . . .

Click on image for closer look. 

Let's start with this beautiful and very easy Z-fold card by Amy Koenders.  Amy started out with Evening Evergreen card stock (11" x 4-1/4", scored at 2-3/4" and 5-1/2") to create the card base.  She then added pieces of Painted Christmas Designer Series paper matted with Cherry Cobbler card stock.  Finally, Amy stamped sentiments from the Holly Jolly Christmas stamp set and leaf and berry images from the Christmas Season stamp set onto white card stock and also matted those pieces with Cherry Cobbler card stock.  For the finishing touch, she attached three Red Rhinestone Basic Jewels around the sentiment on the card front.  The end result is this stunning card.

To see Amy's complete directions, including a link to her YouTube video, visit her site at Stampin’ Up! Christmas Season With Holly Jolly Wishes Z-Fold Christmas Card – Stamp With Amy K.

I hope you enjoy this festive holiday card!

Cathy  ;D


Friday, December 3, 2021

Last Chance Sale!!! Now through January 3, 2022.


Visit my Stampin' Up! website at Cathy Hansen, Independent Stampin' Up! Demonstrator (stampinup.net) to check out the Last Chance products, some at discounts as high as 50%!  This year-end clearance consists of retiring items from the 2021 July-December Mini Catalog.  IMPORTANT NOTE:  These items will be available through January 3, 2022, OR WHILE SUPPLIES LAST!  

You also can view the complete list of retiring items at Cathy's Craft Room: Stampin' Up! Current Promotions (cathyscraftroom.blogspot.com).

If you're ordering online and your total is less than $150, please apply the current host code (VKPK2AUW).  If your order is $150 or more, DO NOT apply the host code and be sure to claim your own host rewards!

Cathy  ;D

Saturday, November 20, 2021

O Christmas Tree (Rose Hill Stamp Camp Card)

This was Rose Hill Card Kits To Go weekend, and I had so much fun creating this card!

Click on photo for closer look.

My card features lots of stamps from my stash, as well as some current Stampin' Up! Specialty Designer Series Paper.  For a complete list of materials and instructions visit Rose Hill Stamp Camp | Facebook.

Cathy ;D

Sunday, November 14, 2021

Reminder: Fall/Winter Fun at The Craft Box this Week!

Happy Sunday morning, Stampers!

Quick Reminder:  This month's class at The Craft Box in Wheat Ridge, CO, is coming up on Friday, November 19, beginning at 1:30 p.m.  We will be making these great seasonal cards!


Contact The Craft Box at 303-279-1069 to reserve your spot!


Cathy ;D


Merry Christmas! (Stamp Camp North 11/13/2021)

This was my card for Stamp Camp North on Saturday, November 13.  I totally love making Christmas cards, and I have only a few more short weeks remaining to create them for use this year, so I'm making the most of it!


Thanks much to Donna Ross, a Stampin' Up! demo in Houston, Texas, for this great layout!  View Donna's original design at Create Christmas Cards using Perfectly Plaid Stamp Set and Coordinating Pine Tree Punch | Stamped Sophisticates.

Materials

Stamp Sets
* Poinsettia Petals ("Merry Christmas")
* Perfectly Plaid (inside sentiment)

Paper
* Blackberry Bliss card stock: 8-1/2" x 5-1/2", scored at 4-1/4"
* White card stock: 5-1/4" x 4" (2 pieces - one for front; one for inside)
* Mossy Meadow card stock: 5-1/4" x 2"; about 2-1/8" x 1-3/4" for tree on front; 5-1/4" x 1-1/4" for punch on inside
* Crumb Cake card stock: 2-1/2" x 2-1/2" for circle

Ink
* Blackberry Bliss Classic Stampin' Pad (sentiment on front)
* Black (sentiment on inside)

Miscellaneous Stuff
* Winter Snow Embossing Folder (White background; retired)
* Tasteful Textile 3D Embossing Folder (Mossy Meadow strip)
* Timber Embossing Folder (Crumb Cake circle)
* Pine Tree Punch (front)
* Evergreen Border (inside)
* 2-1/2" Circle Punch (retired - substitute current item 151770 Layering Circles Dies)
* Blackberry Bliss Striped Ribbon (retired)
* Self-adhesive Stars (retired - substitute current item 156484, Cute Stars Adhesive-Backed Sequins)
* Clear Self-adhesive Rhinestones
* Optional: Wink of Stella Glitter Brush (see note in Step 7 below)
* Adhesives: Stampin' Seal tape runner; Stampin' Dimensionals or Foam Adhesive Strips; Tombow Liquid Glue; Glue Dots

Assembly

1. Fold Blackberry Bliss card stock away from 4-1/4" score line to create card base.
2. Use Blackberry Bliss ink to stamp "Merry Christmas" near bottom right of white card stock; use Winter Snow embossing folder to add texture; set aside until Step 5 below.
3. Use Tasteful Textile 3D embossing folder to add texture to 5-1/4" x 2" Mossy Meadow card stock;  adhere to white card stock.
4. Cut a length of ribbon about 6-1/4" long; wrap around Mossy Meadow and white card stock and adhere ends to back.  
5. Adhere white card stock to card front.
6. Punch 2-1/2" circle from Crumb Cake card stock; use Timber embossing folder to add texture.
7. Punch Pine Tree from Mossy Meadow card stock.  Use Wink of Stella to add shimmer to tree; adhere to Crumb Cake circle.  (NOTE:  Rather than using Wink of Stella on each of the 80 pine trees I punched out for Stamp Camp, I used a solution of Iridescent Medium and water to spritz glimmer onto card stock before punching.)
8. Use Stampin' Dimensionals or Foam Adhesive Strips to adhere Crumb Cake circle to card front.  Embellish with a star at the top of the tree and a few rhinestones scattered randomly around circle.
9. Make a 2" wide bow and apply a glue dot behind the knot to adhere to card front.


10. Use black ink to stamp sentiment on second piece of 5-1/4" x 4" white card stock.  Adhere to inside of card.
11. Punch Evergreen Border from 5-1/4" x 1-1/4" Mossy Meadow card stock; use liquid glue to adhere across bottom of white card stock.

Fun stuff?  You bet!  I hope you enjoy this card idea.

Cathy  ;D


Thursday, October 28, 2021

Happy Thanksgiving Card (Rose Hill Card Kits To Go - October 2021)

This was such a fun card to make using a combination of current and retired Stampin' Up! supplies, as well as some great craft store sale finds!


Stampin' Up! materials used:
  • Layering Circle Dies (retired)
  • Parisian Flourish 3D Embossing Folder (current)
  • Acorn Punch (retired)
  • Soft Suede card stock (current)
  • Early Espresso card stock (current)

Other Stuff:
  • Paper Leaves
  • Glitter Spray
  • Starform Glitter Stickers

Visit Rose Hill Stamp Camp | Facebook for all the details.  (If you're not yet a member, just ask -- we'll be happy to welcome you to the group!)

Cathy :D


Monday, September 20, 2021

Craft Box Class Projects (September 17, 2021)


Click on image for closer look


These are the projects we made at The Craft Box last Friday, September 17. It was a wonderfully fun class -- we laughed and played and made these beautiful cards.

The raven card on the left was prestamped and the raven image was pre-cut on my Scan 'n Cut.  The raven, sentiment and background are stamps from my stash.  Both the raven and sentiment were stamped in black in and embossed with clear embossing powder to make them glossy.  The Ornate Frames dies from Stampin' Up! were used to cut out the sentiment and frame.  Card stock: Basic Black, Gray Granite, and Basic White.  The background was stamped with Gray Granite ink, and then most of the pieces were smudged around the edges with a sponge and Gray Granite ink.

The top card in the center is a Double-Z Side Pull Card based on a wonderful design by Angie Leach (Tool Cool Stamping).  You can find full directions for Angie's card at Stamp-of-the-Month: Snow Place Double-Z Side Pull Card - Too Cool Stamping.  My card uses all Stampin' Up! materials:  Night of Navy card stock for the base and mat pieces, Misty Moonlight card stock for the Double-Z fold base, Feels Like Frost 6" x 6" Designer Series Paper (silver pieces on front), and Basic White card stock for the inside piece, snowman and trees.  The snowman and trees are from the Snow Wonder Stamp Set; the snowflakes embossed on the inside are included in the coordinating Snow Time dies.  (The sentiment is from my stash.)

The bottom card is a fall-themed tower pinwheel card.  You can find video instructions for this type of card all over the Internet, but my favorite is from my friend Kathy Howes (Be Creative with Kathy).  You can view Kathy's tutorial at Be Jolly Tower Pinwheel card - YouTube.  All of the materials for this card are from Stampin' Up!  The base is made from In Good Taste Designer Series Paper.  I also used this for the layers on the panels.  Springtime Foils Specialty Designer Series Paper (retired) is used for each panel base piece, and Brushed Metallic card stock is used for the leaves.  The sentiments and and leaves are from Love of Leaves stamp set and coordinating Stitched Leaves dies.  The sentiments are stamped with Early Espresso ink and then embossed with clear embossing powder; each piece (except for the base piece for each panel and the inside core piece) is distressed around the edges with a Soft Suede Classic Stampin' Pad.  The final step is adding a few gold Metallic Pearls to each panel.

The final card on the right is a slimline card (8-1/2" x 3-1/2") made with the awesome Beauty of the Earth Designer Series Paper.  I CASEd a card by Lynn Starz for this card, using most of the same colors, although I substituted Night of Navy card stock for the Basic White card base on Lynn's card. Also, rather than using ribbon (basically because I couldn't find any that I liked), I added a die-cut bow. See Lynn's original design at Beauty of the Earth Designer Series Paper Slimline Card - Stamping with Lynn (starzlstamps.com).  Other materials for this card include the Beautiful Tree dies for the bird and the Stitched Rectangle dies for the sentiment.  The sentiment itself is a stamp from my stash.

I hope you like these designs.  Check out my Upcoming Events page later this week for information about my October class at the Craft Box -- we'll be making all Christmas cards!

Cathy  ;D


Sunday, September 12, 2021

Autumn Greetings (Stamp Camp North September 2021)

Howdy, stampers!  This is the card that was made at my table this past Saturday at Stamp Camp North.  I'm totally tired of 100 degree temperatures, so this is my wishful thinking for fall to bring cooler weather.

Click on image for closer look.

The materials list for this card appears below, as well as a video tutorial showing how the card was assembled.

Inside

Autumn Wishes (Celebrating Sunflowers)

Materials
* Celebrating Sunflowers Stamp Set
* Black Stamp Pad
* Stampin’ Write Markers:
Bumblebee
Crumb Cake
Daffodil Delight
Early Espresso
Old Olive
Soft Suede
* Early Espresso card stock – 8-1/2” x 5-1/2”, scored at 4-1/4” (card base); 4” x 1” (mat for sentiment)
* Basic White card stock – 5” x 3-3/4” (first layer on card front); 3-3/4” x 3/4" (sentiment); 8-1/4” x 5-1/4”, scored at 4-1/4” (additional scoring for inside explained below); scraps for die cuts
* Bumblebee card stock – 4-3/4” x 3-1/2”, embossed with Timeworn Type 3D embossing folder
* Adhesives: Stampin’ Seal, Stampin’ Seal +, Stampin’ Dimensionals; Tombow Liquid Glue

NOTE: Sentiment was generated on my computer using Microsoft Word (Script MT Bold font)


Cathy  ;D

Saturday, August 28, 2021

Thinking of You - June 2021 Paper Pumpkin Alternative Card

The June 2021 Paper Pumpkin kit, Expressions in Color, had such beautiful elements, I needed to find a way to use them for my August card kits to go.  This is what I came up with.

Click on image for closer look.

Elements from Paper Pumpkin Kit
* Evening Evergreen notecard base
* Designer Paper
* Label
* Iridescent Sequins

All Materials

Card Base
* Evening Evergreen card stock: 8-1/2" x 5-1/2", scored at 4-1/4"

Card Front
* First Layer: Basic White card stock: 4-3/4" x 3-3/4"
* Second Layer: Evening Evergreen notecard base from Paper Pumpkin kit, cut to 4-1/2" x 3-1/2"
* Third Layer: Basic White card stock:  3-1/2" x 2-5/8"
* Top Layer: Designer Paper from Paper Pumpkin kit, cut in half: 3-1/4" x 2-3/8"
* Label:  Element from Paper Pumpkin kit
* Sentiment stamp from my stash
* Basic White Thick card stock: scraps for butterfly dies
* Iridescent Sequins from Paper Pumpkin kit 
* Timeworn Type 3D embossing folder
* Brilliant Wings Dies
* Evening Evergreen Classic Stampin' Pad
* Refill Ink:  Evening Evergreen, Pear Pizzazz, Soft Succulent
* Aqua Painter

Inside
* Basic White card stock: 5-1/4" x 4"
* Evening Evergreen: scraps for butterfly punch

Assembly Details

1.  Fold 8-1/2" x 5-1/2" card stock away from score line to create card base.

2.  Cut 5" x 3-1/2" notecard base from Paper Pumpkin in half at score line; trim each piece to 4-1/2" (set one aside for another card).  Emboss with Timeworn Type 3D embossing folder.  Adhere to 4-3/4" x 3-3/4" Basic White card stock.

3.  Cut Designer Paper from Paper Pumpkin kit in half to create 3-1/4" x 2-3/8" piece.  Adhere to 3-1/2" x 2-5/8" Basic White card stock.  Center and adhere this piece to embossed card stock created in last step.  Center and adhere assembled piece to card front.

4.  Use Evening Evergreen ink to stamp sentiment on label.  Center and adhere over Designer Paper.

5.  Fill Aqua Painter about half-way with water; add several drops of one of the Refill Ink colors listed above until you have the desired color.  Tap side of Aqua Painter on a bone folder or pencil or other item to splatter color onto a piece of Thick White card stock.  Repeat with the other two colors, until you have the desired amount of splatter on the card stock.  Use the Brilliant Wings dies to cut two butterflies from this card stock.  Use a thin line of liquid glue down the center of each butterfly to adhere them to the card front as shown.

6. Add self-adhesive Iridescent Sequins from Paper Pumpkin kit randomly on Designer Paper.

Click on image for closer look.

Inside

7. On 5-1/4" x 4" Basic White card stock, repeat the splatter process in one corner.

8. Punch two butterflies from Evening Evergreen card stock and adhere with glue dots or liquid glue. 

My samples didn't use any Wink of Stella, but I think they would look really nice on all of these butterflies, don't you?!


Hope you enjoy this card!  Click on the image above, or visit https://youtu.be/sH6jGU9DLLI to watch a video tutorial for this card.

Cathy  ;D


Wednesday, August 18, 2021

Kindness Thank You Card with Gilded Leafing

This card was my submission for a card swap in which I recently participated featuring items from the Stampin' Up! July-December 2021 Mini Catalog.

Click on image for closer look.

Materials

Stamp Sets
* Peaceful Cabin** (sentiments)
* Queen Anne's Lace (inside image)

Paper
* Early Espresso card stock: 8-1/2" x 5-1/2", scored at 4-1/4" (card base); 3-3/4" x 2-1/8" (mat for designer paper); 4-1/8" x 1" (mat for sentiment)
* Gray Granite card stock: 5-1/4" x 4" (two -- one for front; one for inside)
* Basic White card stock: 3-7/8" x 3/4" (sentiment); 5" x 3-3/4" (inside)
* Blackberry Beauty Specialty Designer Series Paper ("DSP"):** about 3-5/8" x 2"

Ink
* Early Espresso Classic Stampin' Pad (sentiments)
* Gray Granite (flower outline and stems on inside)
* Sahara Sand (solid flowers on inside)

Accessories and Tools
* Lovely Labels Pick-a-Punch
* Gilded Leafing
* Timeworn Type 3D Embossing Folder**

** Items from July-December 2021 Mini Catalog

Inside

Alternate designs, depending on how DSP is cut.


Visit Cathy's Craft Room on YouTube to see a video tutorial that includes a quick demo showing how to use Gilded Leafing.

Hope you enjoy this card and the video!

Cathy  ;D


Friday, August 13, 2021

Beautifully Penned Fun Fold Card

Today's card design is the one I made for Stamp Camp North August live event.  The card features the Beautifully Penned Designer Series Paper from Stampin' Up!  See information below about how you can get this paper for FREE!

Click on image for closer look.

Thanks to Stampin' Up! Demonstrator Mary Knabe (www.stampinpeace.com) for sharing this great design layout!

Materials

Stamp Set
* Happy Thoughts

Ink
* Basic Gray Classic Stampin’ pad
* Basic Gray Stampin’ Write Marker

Paper
* Basic Black card stock
   5-1/2” x 7”, scored at 4-1/4”; 3-3/4” x 3”, scored at 1/2” along long edge
* Basic White card stock
   5-1/4” x 4”, embossed with Meadow Moments Embossing Folder (inside)
   about 2-1/4” x 1-1/8” for Timeless Label Punch (retired)
   about 4” x 2” for Meadow die (flower)
* Beautifully Penned 12" x 12" Designer Series Paper ("DSP")**
   5-1/4” x 2-1/4” (flower design) for left panel
   3-1/2” x 2-1/4” (striped design) for right panel

Other
* Metallic Pearls
* Meadow Dies (flower)
* Meadow Moments Embossing Folder (inside)
* Timeless Label Punch (retired)
* Adhesives: Stampin' Seal, Stampin' Dimensionals; Tear 'n Tape; Tombow Liquid Glue

Assembly
NOTE:  Unless otherwise indicated, Stampin' Seal used to assemble card.

Basic instructions appear below.  Visit Cathy's Craft Room on YouTube to view my video tutorial.

    1. Fold card base at 4-1/4" score line and turn so short (2-3/4" wide) flap is on front.  
    2. Fold 3-3/4” x 3” black card stock at 1/2" score line.  Use Tear 'n Tape to adhere 1/2" flap to back of card so panel folds to front on right side of card.  (See photo or watch video.)
    3. Adhere 5-1/4” x 4” embossed white card stock to inside of card with embossed edge on right side of card.
    4. Adhere 5-1/4” x 2-1/2” flowered DSP to left panel on card front.
    5. Adhere 3-1/2” x 2-1/4” striped paper to right panel on card front.  Use die to cut flower from Basic White card stock.  Use liquid glue to adhere flower over DSP; trim bottom of stem to fit panel.  Apply self-adhesive silver metallic pearls to centers of flowers.
    6. Stamp sentiment on Thick White card stock and punch out.  Use Basic Gray Stampin' Write marker to trace a thin line around edge of label.  Apply Stampin' Dimensionals to back of label ON LEFT SIDE ONLY.
    6. Close card.  Remove backing from Stampin' Dimensionals and adhere to left panel, making sure the adhesive doesn’t overlap the right panel.

** Stampin' Up!'s Fall Sale-a-Bration is going on NOW!  With every catalog order of $50 or more select free merchandise from the Sale-a-Bration Brochure.  The Beautifully Penned DSP is one of the free items.  Click on the Sale-a-Bration image to the right to visit my Stampin' Up! website for all the details.

I hope you enjoy this card!

Cathy  ;D


Monday, August 9, 2021

Last Zoom Class of the Summer: Thursday, August 19

We will be making these fun cards in my last Zoom class of the summer next Thursday, August 19.

Click on image for closer look.

Visit Cathy's Craft Room: Upcoming Events (cathyscraftroom.blogspot.com) for details and sign-up information.

Cathy ;D

Welcoming Woods Winter Card (July-December 2021 Mini Catalog)

Happy Monday morning, stampers!  Today I'm bringing you a card that I CASEd from Sam Hammond Donald, a Stampin' Up! Demonstrator in the UK.  You can see Sam's original design at #1 Stampin’ Up! UK Demonstrator Pootles – Welcoming Woods Sneak Peek Simple Card Idea.

Click on photo for closer look.

Materials

Stamp Set
* Welcoming Woods (July-December 2021 Mini Catalog)

Card Stock
* Highland Heather: 8-1/2" x 5-1/2", scored at 4-1/4" (card base); 2-3/4" x 1-1/4" (mat for sentiment)
* Night of Navy: 5-1/4" x 4" (two -- one for inside); 2-5/8" x 1-1/8" (mat for sentiment)
* Basic White: 5" x 3-3/4" (two -- one for inside); 2-1/2" x 1" (sentiment)

Ink
* Black
* Night of Navy Classic Stampin' Pad
* Misty Moonlight Classic Stampin' Pad
* Highland Heather Classic Stampin' Pad

Tools and Accessories
* Blending Brushes
* Wink of Stella Clear Glitter Brush
* Adhesives: Stampin' Seal, Stampin' Dimensionals

Assembly
Unless otherwise indicated, Stampin' Seal used throughout.

1. Fold 8-1/2" x 5-1/2" card stock at 4-1/4" score line to create card base.
2. Adhere 5-1/4" x 4" Night of Navy card stock to card front.
3. Use Blending Brushes to apply Night of Navy ink to top portion of 5" x 3-3/4" white card stock; repeat with Misty Moonlight ink, applying ink over and below Night of Navy; repeat with Highland Heather ink, applying ink over other colors and extending below.
4. Use Black ink to stamp trees image over blended colors.    NOTE:  You will need to stamp the design twice to cover entire piece of paper.
5. Use Black ink to stamp horizontal image.  NOTE:  The image to the left was stamped a little higher than the one to the right.
6. OPTIONAL:  Once ink is completely dry, splatter some Wink of Stella glitter over image to create the illusion of snow falling.  It's kind of hard to see it on the photo, but if you click on the image to take a closer look, you should be able to see some of the glitter here and there.
7. Adhere 5" x 3-3/4" stamped white card stock to card front over Night of Navy card stock.
8. Adhere 2-5/8" x 1-1/8" Night of Navy card stock to 2-3/4" x 1-1/4" Highland Heather card stock.  Use Black ink to stamp sentiment on 2-1/2" x 1" white card stock; use Blending Brush to apply small amount of Night of Navy ink near top of label.  Adhere sentiment over Night of Navy card stock, and then attach to card front with Stampin' Dimensionals.

Apologies for poor quality of photo -- I'm blaming it on lighting.
It's actually WHITE card stock; not Vanilla!

9.  Adhere second piece of 5-1/4" x 4" Night of Navy card stock to inside of card.
10. Use Night of Navy and Highlands Heather ink to stamp snowflakes on second piece of 5 x 3-3/4" white card stock.  Adhere over Night of Navy card stock.   NOTE:  To achieve the pale shade for the snowflakes, I stamped the image on scrap paper several times without reinking before stamping on card stock.  This technique is called "stamping off."

That's it!  A fairly simple card, but with striking results!  I hope you enjoy it.

Cathy ;D

Sunday, August 8, 2021

New Penguin Place Stamp Set (plus FREE Designer Series Paper)

Welcome to winter in August!!!  I just finished this card for a swap using the FREE Penguin Playmates Designer Series Paper from the Fall 2021 Sale-a-Bration Brochure.  The card also uses the coordinating Penguin Place Stamp Set from the July-December 2021 Mini Catalog.

Click on image for closer look.

Materials

Stamp Sets
* Penguin Place* (snowflakes)
* Christmas to Remember* (sentiments)

Paper
* Misty Moonlight card stock: 11" x 4-1/4", scored at 2-3/4" from each short end; about about 4" x 2-3/4" for diorama die (mat for sentiment)
* Basic White card stock: about 3-1/2" x 2-5/8" for smaller diorama die (sentiment); 5" x 4-1/4" (inside)
* Penguin Playmates Designer Series Paper ("DSP")**: 4" x 2-3/4" (striped design - 2 pcs.);  penguins, snowman and polar bear (fussy-cut)

Ink
* Misty Moonlight Classic Stampin' Pad
* Fresh Freesia Classic Stampin' Pad

Accessories and Tools
* Layering Diorama Dies
* Adhesives: Stampin' Seal, Stampin' Dimensionals, Liquid Glue
* Optional: Black Journaling Pen
* Optional: Wink of Stella Clear Glitter Brush

* July-December 2021 Mini Catalog
** August-September 2021 Sale-a-Bration Brochure (FREE with $50 catalog purchase)

Assembly
(Stampin' Seal used for assembly unless otherwise indicated)

1. Fold 11" x 4-1/4" card stock away from both score lines to create a card base that opens in the center.
2. With card closed, adhere 4" x 2-3/4" striped DSP to each of the two front panels.
3. Cut center (fourth from smallest) diorama shape from Misty Moonlight card stock; cut next smaller (third from smallest) diorama shape from Basic White card stock.
4. Stamp sentiment on Basic White shape with Misty Moonlight ink; stamp snowflakes with Fresh Freesia ink.  Adhere sentiment to Misty Moonlight shape and attach shape to left panel of card front.  (NOTE:  Apply adhesive to back of left side only so you don't glue the card shut!)
5. Cut penguin and snowman shapes from DSP.  Use liquid glue to adhere upper left portion of snowman to sentiment as shown.  Attach penguin with Stampin' Dimensionals.
6. Optional -- Dot centers of each snowflake with Wink of Stella.


7. Stamp sentiment on 5-1/4" x 4" Basic White card stock with Misty Moonlight ink; stamp snowflakes with Fresh Freesia ink.  Adhere to center panel on inside of card.  Cut small penguin and polar bear from DSP and adhere as shown with liquid glue.

NOTE:  These DSP shapes are fairly easy to fussy-cut with your Paper Snips; however, since I was making 20 cards for my swap, I cheated and cut them out with my Brother Scan 'n Cut.  Warning:  If you are using this machine, you will need to use a fine-line black pen to trace around the white shapes.  The background color is so pale that my machine had a difficult time distinguishing the shapes -- especially the snowman and the polar bear -- and wanted to cut out only the scarves and hats!

Hope you enjoy this fun card!

Cathy :D


Wednesday, July 21, 2021

Fall-Themed Card with Cork Specialty Paper

This fun easel card is also a shaker card! The card showcases the new Cork Specialty Paper featured in the July-December 2021 Mini Catalog.

The Cork Specialty Paper is thin and flexible and has the feel of cork. It’s also got wonderful little bits of a gold metallic substance peeking through little cracks on the surface. The back of the paper appears to be kraft paper. Very fun to work with.

This card also has several die cut shapes using the Brushed Metallic Card Stock from the July-December 2021 Mini Catalog.

Thanks to Stampin' Up! Demonstrator Arlene Ross for the card front layout.  Visit WHAT AJ MADE: Masculine Cards to see Arlene's design.

Materials

Paper

Card Base

* Soft Suede card stock – 11” x 4-1/4”, scored at 2-3/4” and 5-1/5”.

Card Front
* Soft Suede card stock – 5-1/2” x 4-1/4”
* Night of Navy card stock – 5-1/4” x 4”
* Cork Specialty Paper – 2-7/16” x 1-13/16” (2 pcs.)
* In Good Taste Designer Series Paper – 2-7/16” x 1-13/16” (2 pcs.)
* White card stock – about 3” x 2” for jar image; 2-1/2” x 2-1/2” for sunflower image
* Brushed Metallic card stock – scraps for background leaves

Inside
* Night of Navy card stock – 5-1/4” x 4”
* White card stock – 5” x 3-3/4”
* Cork Specialty Paper 3-3/4” x 1”

Sentiment
* Night of Navy card stock – 4-1/2” x 1”
* Brushed Metallic card stock – 4-3/8” x 7/8"
* White card stock – 4-1/4” x 3/4"

Stamps and Ink
* Jar of Flowers
* Peaceful Moments (sentiment)
* Black ink
* Stampin’ Blends: Blackberry Bliss, Bronze, Daffodil Delight, Ivory, Night of Navy, Soft Succulents

Accessories and Tools
* Jar Punch
* Jar Shaker Dome
* Sunflower Dies
* Poppy Moments Dies
* Lovely Labels Pick-a-Punch
* Metallic Pearls
* Linen Thread (about 24”)
* Sequins for Everything
* Clear Embossing Powder
* Heat Tool

Visit Cathy’s Craft Room on YouTube (https://youtu.be/-Ex7aYEIAok) to view a video tutorial.


Hope you enjoy this card!

Cathy :D


Monday, July 12, 2021

Hello Friend Greeting Card (Stamp Camp North 07/10/2021)

This past Saturday, my friend Juli Whitfield hosted the first live Stamp Camp North since March 2020.  It was nice to see everyone again, even though I kept my face mask on most of the time (I'm still not quite ready to be in a crowd of people without protection).

This is the card that was made at my table.  Thanks much to Stampin' Up! Demonstrator Su Mohr (AromasandArt.com) for this great layout.  View Su's original design at Brilliant Wings In Rainbow Glimmer Paper - Aromas and Art.


Materials

Card Front
* Thick White card stock: 8-1/2" x 5-1/2", scored at 4-1/4" (card base)
* Fresh Freesia card stock: 5-1/4" x 4" (first layer)
* White card stock:  5-1/8" x 3-7/8", textured with Ornate Floral 3D embossing folder
* Fresh Freesia card stock: 2-1/2" x 1-1/8" (mat for sentiment)
* White card stock: 2-3/8" x 1" (Stitched Rectangles die cut for sentiment)
* Hydrangea Hill Designer Series Paper from January-June 2021 Mini Catalog: 2-7/8" x 7/8" (2 pieces cut with Stitched Rectangles dies behind butterfly)
* White card stock: 2-7/8" x 7/8" (2 pieces adhered to backs of DSP die cuts for stability) 
* Fresh Freesia Shimmer Vellum:  @2-1/2" x 2" for butterfly cut out with Brilliant Wings die


Inside
* Fresh Freesia card stock: 5-1/4" x 4" (first layer)
* White card stock: 5-1/8" x 3-7/8"

Stamp Set: Queen Anne's Lace

Ink:
* Basic Gray Classic Stampin' Pad (sentiments and flower stems)
* Fresh Freesia Classic Stampin' Pad (flowers on inside)

Adhesives:
* Double-sided adhesive tape runner
* Stampin' Dimensionals to pop up DSP vertical strips on card front
* Tombow Liquid Glue to adhere body of butterfly on card front

Tools (also listed above)
* Ornate Floral 3D embossing folder
* Stitched Rectangles Dies
* Brilliant Wings Dies

Watch this post!  As soon as I've recorded my YouTube video showing how this card was assembled, a link will be added.

Thanks!

Cathy  ;D

Wednesday, July 7, 2021

Zoom with Cathy Thursday morning, July 15!

Join me online to make these three fun projects!


Yes, it's true . . . as many of you know, I am not a fan of the idea of "Christmas in July," but I know some people love it, so I'm including a snowman card as a nod to this ridiculous trend.

The card on the left was designed using pieces parts from the April 2021 Paper Pumpkin kit, "So Cool."  (Many thanks to Cheryl Horvath for this idea.  View Cheryl's YouTube video for more ideas at April 2021 Stampin' Up Paper Pumpkin Kit - Alternative Designs - YouTube.)

The card on the right has been designed as a Thank You card, but the stamp set ("Sailing Home") also has an option for a Congrats card -- both are included in materials packets.

Be sure to sign up for this class by Wednesday, July 5, to have materials mailed to you; if you're picking up materials at my house, RSVP by Saturday, July 10.

See the flyer with all the details at Cathy's Craft Room: Upcoming Events.

I look forward to seeing you soon!

Cathy  ;D


Saturday, July 3, 2021

Follow by E-mail Feature No Longer Available as of July 2021

As of this month, the Follow by E-mail feature is no longer available for this blog.  If you would like to receive notifications when this site is updated, please comment below, and I will be happy to add you to a notification distribution list so you will know every time something new has been added.

Thanks much to those of you who have been following me for the past several months and years!

Cathy  ;D

Tuesday, June 15, 2021

Bloom Where You're Planted Suite Easel Card

Today's card features the Bloom Where You're Planted Suite from the 2021-2022 Stampin' Up! Annual Catalog (pages 80 and 81). I started envisioning this card as soon as I saw this beautiful suite! As I was working on it, it just kind of grew and grew until I had an entire jungle!

Front

Inside

Opened with easel set up

Materials

Bloom Where You're Planted Suite
* Plentiful Plants stamp set
* Perfect Plants dies
* Bloom Where You're Planted 12" x 12" Designer Series Paper
* Paper Lattice

Paper
Card Base
* Evening Evergreen card stock
        8-1/2" x 5-1/2", scored at 2-1/8" and 4-1/4"
Card Front
* Evening Evergreen card stock
        5-1/2" x 4-1/4" (base for card front)
* Cinnamon Cider card stock
        5-1/4" x 4" (layer 1)
        2-1/2" x 3/4" (mat for sentiment on card front)
        2-1/4" x 1-3/4" (plant hanger die)
        1-1/4" x 1/4" (ledge for small plant on card front)
* Basic White card stock
        2-1/4" x 9/16" (sentiment)
* Paper Lattice
        5" x 1-5/8" (one piece cut in half lengthwise) 
* Bloom Where You're Planted DSP
        5" x 3-3/4" (white brick design for layer 2)
        Various shapes and sizes for plant cut-outs
Inside
* Basic White card stock
        5-1/4" x 4", stamped with sentiment
        4-1/8" x 7/8", scored at 3/8", 3/4", 2-1/4" and 2-5/8" (support bracket for large plant)
        2-1/4" x 3/4", scored at 1/4", 1/2", 1-1/4" and 1-1/2" (support bracket for small plant)
* Cinnamon Cider card stock
        5-1/4" x 1-1/2" (bottom, textured with Brick and Mortar embossing folder)
* Evening Evergreen card stock
        3-3/8" x 1-5/8" (base for large plant)
* Bloom Where You're Planted DSP
        Various shapes and sizes for plant cut-outs
* Paper Lattice
        3-1/4" x 1-9/16" (one piece cut in thirds widthwise)

Other
* Evening Evergreen Classic Stampin' Pad
* Gold Metallic Pearl
* Adhesives:  double-sided adhesive runner, Stampin' Dimensionals, liquid glue, Tear 'n Tape

Assembly


Click on the image above, or visit my Cathy's Craft Room YouTube site to watch a video showing how this card was assembled.

Hope you enjoy this card.  Truly, it started out to be a simple card, but the plants just kept coming . . . .

Cathy  ;D