Thursday, December 28, 2017

Sneak Peek - Brusho and Pandas!

Hi, folks!  Here's my first sneak peek at a couple of items featured in the 2018 Occasions and Sale-a-Bration catalogs.

The first is Brusho Watercolor Crystals . . . so cool!  Very intense color, and the crystals will last a LONG time because you only need a very small amount to get brilliant colors!  These will be featured in the 2018 Occasions Catalog.

The second is Party Pandas stamp set, which will be featured in the 2018 Sale-a-Bration catalog (free with a $50 order).

And . . . drum roll . . . here's the card!  I made this for a demo swap this week and couldn't wait to share it with you!

Click on photo for closer look.
Materials

Stamp Sets
* Party Pandas (2018 Sale-a-Bration)
* Happy Celebrations

Paper
* Basic Black card stock (8-1/2" x 5-1/2")
* Whisper White card stock (5-1/4" x 4")
* Whisper White THICK card stock (about 2" x 2" for panda; 4" x 1-1/2" for celebrate)
* Glossy White card stock (about 2" x 2" for balloon)

Ink
* Basic Black Archival Ink
* VersaMark Ink
* Crushed Curry Classic Stampin' Pad
* Basic Black Stampin' Write Marker

Accessories and Tools
* Clear Embossing Powder
* Heat Tool
* Stampin' Sponge
* Basic Black Solid Baker's Twine
* Balloon Bouquet Punch
* Brusho (Brilliant Red, Prussian Blue, Yellow) (2018 Occasions Catalog)
* Stampin' Spritzer
* Iridescent Sequin Assortment
* Adhesives:  Fine Tip Glue Pen, Glue Dots, SNAIL Adhesive, Stampin' Dimensionals, Tear and Tape

Instructions

1. Score 8-1/2" x 5-1/2" card stock at 4-1/4"; fold away from score line to create card base.

2. Adhere 5-1/4" x 4" Whisper White card stock to front of card.

3. Use VersaMark Ink to stamp HAPPY three times from upper left to lower right.  Cover with Clear Embossing Powder and heat emboss with Heat Tool.

4. Place card stock on paper towel or water resistant craft sheet and spritz with water.  Sprinkle small amounts of Red, Blue and Yellow Brusho Crystals across water and set aside to dry.  You also can use a heat tool to dry it . . . or daub it with a paper towel . . . but you won't get quite the same effect as if you allow it to air dry.  (NOTE:  Stampin' Up! suggests using watercolor paper or shimmery white card stock with Brusho, but for this card I just used regular Whisper White card stock and got good results.)

5. Once this piece is completely dry, flatten it out by placing it inside a folded piece of copy paper and running it through your Big Shot or kind of pulling/rubbing it across the edge of your tabletop to ease out the curl caused by the water.  Adhere to front of card with Tear and Tape or Liquid Glue.

6. Use Basic Black ink to stamp Panda image on Whisper White THICK card stock.  Cut out image with scissors and adhere near lower left corner with Stampin' Dimensionals.

7. Use Basic Black ink to stamp celebrate on Whisper White THICK card stock.  Cut around image with scissors, and then apply ink around the outer edge of the card stock by lightly running the side of the brush end of the Basic Black Stampin' Write Marker against edge of paper.  Adhere to front of card with Stampin' Dimensionals.

8. Punch small balloon from Glossy White card stock.  Use Stampin' Sponge to daub Crushed Curry ink on card stock.  Again, use side of brush end of marker to apply ink to edge of balloon.  Place Glue Dot behind stem of balloon and wrap Baker's Twine around  stem once.  Adhere other end of Baker's Twine to panda's paw with another Glue Dot. 

9.  Use Fine Tip Glue Pen to adhere sequins randomly to front of card.

Is this fun or what?!  My January classes in my craft room will feature Brusho!  There are so many ways to use it and it's just so much fun!  (And a little messy, but that's part of the fun!)

Monday, December 25, 2017

Piano Card with Instructions (originally posted 12/25/2017)

This is the special card I posted on Christmas Day.  As promised, the materials and instructions appear below.

Click on image for closer look.
Thanks to Faye Russell for posting a photo of the card that inspired this creation.  Unfortunately, there was no link to identify the creator.  You can view the original card by clicking HERE.

Materials

Stamp Set
* Colorful Seasons

Paper
* Basic Black card stock (8-1/2" x 5-1/2"; 5-3/8" x 4-1/8"; 5-3/8" x 2-5/8"; 3/4" x 3/8" (10))
* Whisper White card stock (1-1/2" x 3/8" (13))
* Merry Music Specialty Designer Series Paper ("DSP") (5-3/8" x 2-1/4")**
* Silver Glimmer Paper (about 3-1/2" x 3-1/2")
* Garden Green card stock (about 5" x 2-1/2")
* Cherry Cobbler card stock (about 5" x 2-1/2")
* Real Red card stock (about 6-1/2" x 2-1/2")

Ink
* Cherry Cobbler Classic Stampin' Pad
* Garden Green Classic Stampin' Pad

Accessories and Tools
* Big Shot Die Cutting Machine
* Seasonal Layers Thinlits Dies
* Detailed Floral Thinlits Dies
* 3/8" Metallic-Edged Ribbon
* Metallic Enamel Shapes
* Adhesives:  SNAIL Adhesive; Multipurpose Liquid Glue; Glue Dot; Tear and Tape; Stampin' Dimensionals

** 2017 Occasions Catalog

Instructions

1. Score 8-1/2" x 5-1/2" card stock at 4-1/4"; fold away from score line to create card base.

2. On 5-3/8" x 4-1/8" Basic Black card stock, use Liquid Glue to:
* Adhere DSP about 1/16" from top edge.
* Adhere Whisper White 1-1/2" x 3/8" pieces of card stock evenly about 1/16" from bottom edge.
* Adhere Basic Black 3/4" x 3/8" pieces of card stock as shown over Whisper White. (NOTE: You will need to trim about 1/16" off the right edge of the last piece on the right to make it fit.)

3.  Cut upper right side of 5-3/8" x 2-5/8" Basic Black card stock to resemble shape of Baby Grand Piano.  Cut a piece of ribbon about 6" long and use Tear and Tape to adhere across bottom edge, securing ends on back of card stock.  Use use Tear and Tape to adhere to front of card over DSP and keyboard.

4. Use Big Shot and Detailed Floral dies to cut Silver Glimmer Paper.  Trim to fit into upper left corner and adhere with Liquid Glue.

5. Use SNAIL Adhesive to adhere assembled 5-3/8" x 4-1/8" Basic Black card stock to front of card.

6. Assembling the poinsettia:
* Use Garden Green ink to stamp two large detailed leaves on Garden Green card stock; use Cherry Cobbler ink to stamp two large detailed leaves on Cherry Cobbler and two on Real Red card stock. Use Big Shot and Seasonal Layers large outline leaf to cut out all leaves. 
* Remove stems and apply Liquid Glue to the lower portion of one Cherry Cobbler leaf; adhere over the bottom portion of the other Cherry Cobbler leaf, creating poinsettia shape.  Repeat with Real Red leaves and Garden Green leaves. 
* Adhere Real Red poinsettia over Cherry Cobbler poinsettia, turning slightly so the bottom petals show between the top petals.
* Cut Green poinsettia shape into four pieces; use Liquid Glue to adhere pieces individually to back of poinsettia, extending leaves as shown.
* Cut small flower for center from Cherry Cobbler card stock; use Stampin' Write marker to draw a few veins on petals.  Adhere to center of poinsettia with Liquid Glue.  (NOTE:  In retrospect, I think I would have used Real Red for this piece instead of the Cherry Cobbler -- in real life it looks ok this way, but when I saw the photo of it, it didn't look quite "real" to me.)
* Add self-adhesive Silver Enamel Circle to center of poinsettia.
* Adhere poinsettia over Glimmer Paper with Stampin' Dimensionals.

7. Make bow and adhere over ribbon strip with a Glue Dot.

Yes, there are a lot of steps and small pieces and precision involved in making this card, but I think the result was worth it!

Next up:  A couple of cards giving you a sneak peek at the upcoming 2018 Occasions and Sale-a-Bration catalogs.

Cathy  :D


Sunday, December 24, 2017

Countdown to Christmas Day 24 - Ugly Christmas Sweater Gift Card Holder

No Christmas collection would be complete without an Ugly Christmas Sweater, right?!  So today's project is an Ugly Christmas Sweater Gift Card Holder.

Click on image for closer look.
Materials

Stamp Set
* Cookie Cutter Christmas

Paper
* Real Red card stock (5" x 5")
* Soft Suede card stock (about 2" x 2" for reindeer head)
* Crumb Cake card stock (about 1-1/2" x 1-1/2" for antlers
* Garden Green card stock (about 2-1/2" x 2-1/2" for pine boughs)
* Red Glimmer Paper (tiny scrap for nose)
* Gold Foil Paper (about 1" x 1" for bell)

Ink
* Tuxedo Black Memento Ink OR Basic Black Archival Ink
* Black Stampin' Write Marker
* Real Red Stampin' Write Marker
* Wink of Stella (Clear)
* White Chalk Marker
* Flirty Flamingo Stampin' Write Marker
* Whisper White Craft Ink

Accessories and Tools
* Envelope Punch Board
* Big Shot Die Cutting Machine
* Cable Knit Embossing Folder
* Pretty Pines Thinlits Dies
* Trim Your Stocking Thinlits Dies **
* 1/8" Handheld Circle Punch
* Sponge Daubers
* Black Rhinestone Jewels **
* Linen Thread
* Black Metallic Thread
* Gold Metallic Thread
* 1/8" Gold Ribbon (about 12")
* Adhesives:  Multipurpose Liquid Glue; Glue Dot

Miscellaneous
* Small Post-it Note Pad

** 2017 Holiday Catalog

Instructions

1.  Score and punch 5" x 5" Real Red card stock according to Punch Board instructions for a 2" x 3-1/2" Business Card.  Trim card stock down about 3/4" from corner on two 3-1/2" sides.  Round one of the remaining corners with the corner rounder on the Punch Board.

2. Use Big Shot and Embossing Folder to texture card stock.  (NOTE:  Line up card stock so top flap -- the one with the rounded corner -- is inside the folder; the bottom corner will stick out of the end of the folder, but it's not important for it to be embossed because it will be covered by the two side flaps.)

3. Fold bottom flap up and apply some Liquid Glue around the corner.  Fold left flap over bottom flap.  Apply Liquid Glue to edges of right flap and fold it over the left flap.  This will form your basic gift card holder.  (See photo at right.)

4. Stamp Reindeer head on Soft Suede card stock and cut out with scissors.  Use White Chalk Marker to color in center parts of ears.  When dry, color over the white with Flirty Flamingo Marker.  Use Sponge Dauber to apply White Craft Ink to cheeks.  When dry, use another Sponge Dauber to apply Flirty Flamingo over White ink.  Use Liquid Glue to adhere head to gift card holder.

5. Stamp antlers on Crumb Cake card stock.  Use Liquid Glue to adhere to gift card holder as shown.  Use Wink of Stella to add some shimmer to the antlers.

6. Before cleaning your stamp, stamp what's left of the ink onto the sticky portion of a post-it note -- this will give you a vague shadow of the nose -- all you need for this step.  Cut out and adhere post-it note nose to back of Red Glimmer Paper.  Cut around the post-it note to create shiny nose.  Use Real Real Stampin' Write marker (brush end) to color just the edges of the glimmer paper.  (NOTE:  I generally do this when I use white-core paper to cover the white around the edges of the shape.)  Use Liquid Glue to adhere to reindeer head.

7. Adhere two small self-adhesive Black Rhinestones for eyes.

8. Holding Linen, Gold and Black Metallic Threads together, make a big loopy bow and attach to gift card holder with a Glue Dot as shown.

9. Use Big Shot and Pretty Pines dies to cut two pine boughs from Garden Green card stock.  Use tiny dots of Liquid Glue to adhere to gift card holder near top of flap.

10. Use Big Shot and Trim Your Stocking dies to cut bell from Gold Foil.

11. Punch a 1/8" circle near top corner.  Thread Gold Ribbon through the hole just made and also the hole at top of bell; hold the two ends of the ribbon together and tie a knot near the end for a hanging loop.

Fun fun fun!!!

Be sure to check back tomorrow for the last in the Countdown to Christmas series.  I've got a beautiful and elegant card in store for you!

Cathy  ;D


Saturday, December 23, 2017

Countdown to Christmas Day 23 - Gift Card Holder

Here's another great way to present a gift card or cash.  It's easy to assemble, and fits into a regular size card envelope for mailing (although it may be a little late for mailing a Christmas gift at this point . . .).

Thanks to Brenda Diaz for this idea.  Click HERE to see Brenda's original design.

Click on image for closer look.
Materials

Stamp Sets
* Labels to Love **
* One Big Meaning (inside)
* Carols of Christmas (inside) **

Paper
* Real Red card stock (11" x 4-1/4"; 9-3/8" x 1-1/2")
* Whisper White card stock (4-1/8" x 3-7/8" - two pieces; 4-1/8" x 1-3/8"; about 2" x 1-1/2" for label)
* Merry Music Specialty Designer Series Paper ("DSP") (4" x 3-3/4"; 4" x 1-1/4")

Ink
* Real Red Classic Stampin' Pad
* Garden Green Stampin' Write Marker (inside)
* Real Red Stampin' Write Marker (inside)

Accessories and Tools
* Everyday Label Punch **
* 1/8" Gold Ribbon
* Metallic Enamel Shapes (Gold)
* Adhesives: SNAIL Adhesive; Multipurpose Liquid Glue; Glue Dot

** 2017 Holiday Catalog

Instructions
(Unless otherwise indicated, SNAIL Adhesive used to assemble.)

1. Score 11" x 4-1/4" card stock at 4" and 9-1/2"; fold away from score lines to create card base.

2. With larger section of card stock to the left, adhere 4-1/8" x 3-7/8" Whisper White card stock to front of card.  Adhere 4" x 3-3/4" DSP over Whisper White card stock.

3. On right side, adhere 4-1/8" x 1-3/8" Whisper White card stock to front of card.  Adhere 4" x 1-1/4" DSP over Whisper White card stock.

Click on image for closer look.

4. On INSIDE of card, apply a thin line of Liquid Glue to top and bottom edges of 1-1/2" panel.  Fold toward the inside to create pocket.

5. On second 4-1/8" x 3-7/8" piece of Whisper White card stock, use Real Red ink to stamp greeting from One Big Meaning set; use Stampin' Write markers to paint holly and berries from Carols of Christmas set and stamp as shown.  Adhere to inside of card.

6. To make belly band that holds card closed, score 2-1/2" in from each short edge of 9-3/8" x 1-1/2" Real Red card stock.  Fold away from score lines and adhere one flap over the other (about 1/2") with Liquid Glue.

7. Stamp Label on scrap of Whisper White card stock; punch out shape with Everyday Label Punch.  Use Liquid Glue to adhere to the belly band hiding the overlap seam.  Slide onto card.

8. Embellish by adding Metallic Enamel Shapes randomly to DSP and a small bow with a Glue Dot at bottom of label on belly band.

This is the gift I will give my mail carrier next week since I missed her today (unfortunately, she arrived WAY EARLIER than usual today and I missed her . . .).

Cathy  ;D

Friday, December 22, 2017

Countdown to Christmas Day 22 - Stocking Gift Holder

Good morning!  Today's project is another stocking, but this time it's 3D pillow box rather than the flat stocking I posted on Day 16, so instead of just gift cards, this one will accommodate candy canes, chocolates, earrings, or other small gifts.

By the way . . . if you visit YouTube and search for "Trim Your Stocking" a whole bunch of video tutorials will appear showing you how to assemble this stocking pillow box.  There are also a ton of great ideas there.  (No -- this project didn't come from there -- it was actually my own original design!)

Click on image for closer look.
Materials

NO STAMP SETS OR INK NEEDED!!!

Paper
* Cherry Cobbler card stock (although any color can be used since it only shows on the back - about 11" x 4")
* Merry Music Specialty Designer Series Paper ("DSP") (about 6" x 4")**
* Dazzling Diamonds Glimmer Paper (about 4" x 2")
* Whisper White card stock (scrap for tag)
* Gold Foil Sheets (scrap for bell)
* Garden Green card stock (scraps for pine branches)
* Wild Wasabi card stock (scraps for pine branches)

Accessories and Tools
* Big Shot Die Cutting Machine
* Trim Your Stocking Thinlits Dies**
* Pretty Pines Thinlits Dies
* Black Metallic Thread
* Gold Metallic Thread
* Linen Thread
* Adhesives:  Multipurpose Liquid Glue; Glue Dots; Mini Stampin' Dimensionals

** 2017 Holiday Catalog

Instructions

1. Use Big Shot and Trim Your Stocking Dies to:
* Cut one stocking shape from Cherry Cobbler card stock and one stocking from DSP.  Cut top flap off of DSP stocking and use Liquid Glue to adhere the stocking to the Cherry Cobbler stocking.
* Cut one cuff, one toe patch and one heel patch from Glimmer Paper.  Adhere to stocking with Liquid Glue.
* Cut one pillow box shape from Cherry Cobbler card stock.  (NOTE:  Do not assemble yet -- set this piece aside until Step 4 below.) 

2. Use Pretty Pines Dies to:
* Cut one small pine branch from Garden Green card stock and one from Wild Wasabi card stock.
* Cut one medium pine branch from Garden Green card stock and one from Wild Wasabi card stock.

3. Use three or four Glue Dots to adhere two small pine branches at top of stocking and to adhere medium pine branches down the left side of stocking as shown.  (NOTE:  If the Glue Dots are too big, you can roll them up to fit behind the branches.  The reason I used Glue Dots rather than Liquid Glue or Fine-Tip Glue is because the Glue Dots seem to adhere a little better to the Glimmer Paper.)

Back of Stocking
4. Fold flaps of Pillow Box back, apply Liquid Glue to the flaps and adhere to the back of the stocking.  The tab at the bottom of the Pillow Box goes at the bottom and tucks up against the back of the stocking to give it a little more security.  (NOTE:  You also could use Tear and Tape to secure the flaps onto the box -- less messy, but not as strong.)

5. Use Big Shot and Trim Your Stocking dies to cut one tag from Whisper White card stock and one bell from Gold Foil.  Holding the bell over the tag, thread a short piece of Linen Thread through the holes at the top and tie in a knot.  Use a Glue Dot to adhere knot to joining of pine branches so the bell and tag can dangle freely.
Click on image to get a better look at the
Black and Gold Metallic Thread.

6. Holding Linen Thread, Black Metallic Thread and Gold Metallic Thread together, make a big loopy bow.  Use a Mini Stampin' Dimensional to adhere over the knot holding on the bell and tag.

7.  Fold the bottom and top of the Pillow Box and Stocking on the curved score lines to create your gift box.


Thursday, December 21, 2017

Countdown to Christmas Day 21 - Shaker Card

Happy December 21 . . . getting closer and closer on our countdown -- or perhaps it's actually a count UP?! to the 25th!

The inspiration from today's card came first of all from today's snow showers . . . and then from a card posted last year by Cathy Caine, Stampin' Up! demonstrator.  Click HERE to view the original card.

Click on image for closer look.
Materials

Stamp Set
* Oh, What Fun!

Paper
* Whisper White THICK card stock (8-1/2" x 5-1/2"; 5" x 3-3/4"; 5" x 2-1/2"; scrap for banner)
* Gold Foil Sheet (scrap for star)
* Fabulous Foil Designer Acetate (2-1/2" x 5")

Ink
* VersaMark

Accessories and Tools
* Big Shot Die Cutting Machine
* Santa's Sleigh Thinlits Dies
* Bunch of Banners Framelits Dies
* Softly Falling Embossing Folder
* Gold Stampin' Glitter
* Gold Embossing Powder
* Heat Tool
* Stampin' Sponge
* Gold and Silver Mini Sequin Trim (about 3" each)
* Adhesives: Fine-Tip Glue Pen; Multipurpose Liquid Glue; Tear and Tape; Foam Adhesive Strips

Miscellaneous
* Gold and clear seed beads from my stash

Instructions

1. Score 8-1/2" x 5-1/2" card stock at 4-1/4"; fold away from score line to create card.

2. Use Big Shot and Santa's Sleigh Dies to cut tree from center of 5" x 3-3/4" card stock.  Use Big Shot and Embossing Folder to add texture.

3. Use Tear and Tape to adhere Acetate over tree on back of card stock.  Apply Foam Strips around tree shape.  Note, you will need to completely enclose the shape to hold the sequins and beads.

4. Pull the sequins off of the string and place inside the shape made in Step 3; add a few seed beads if you like.  Remove Foam Tape backing and place 5" x 2-1/2" card stock over the shape to enclose the sequins and beads.

5. Apply foam tape around outer edge of embossed card stock, and also apply Liquid Glue or Tear and Tape to card stock covering the tree shape.  Adhere this piece to front of card.

6. Use Fine-Tip Glue Pen to apply a tiny dot of glue to a few random snowflakes on front of card.  Sprinkle Stampin' Glitter over glue.  Allow to dry for a few seconds, and then flip card over and tap on back to remove excess glitter.

7. Use Big Shot and Gold Foil to make star.  Adhere to top of tree with a small piece of Stampin' Dimensionals.

8. Use VersaMark to stamp sentiment on scrap of card stock; cover with embossing powder.  Tap off excess powder and set with Heat Tool.  Use Big Shot and Bunch of Banners to cut out banner.

9. Use Stampin' Sponge to apply a little VersaMark ink around edges of banner and cover with embossing powder.  Tap off excess powder and set with Heat Tool.  Adhere banner to front of card with Stampin' Dimensionals.

I actually tried something different for this sample card.  Instead of using foam tape around the tree shape (the traditional way of making a shaker card), I cut several pieces of 5" x 2-1/2" card stock and cut the tree shape out of them.  Then I used Liquid Glue to layer the pieces together and adhered them on the back of the card stock, lining them up with the tree shape.  It worked great, but added more weight to the card than the foam tape.

The original version had a big bow on it, but I just couldn't bring myself to do that -- so mine is somewhat more subdued.  Hope you enjoy it!

Cathy :D

Wednesday, December 20, 2017

Countdown to Christmas Day 20 - Money Holder Card

Good morning!  Today's project is for a last minute gift idea -- a card to hold money or a check!  This is an odd-sized card (7" x 4"), so you'll need to either wrap it as a gift or use your Envelope Punch Board to make an envelope for it.

Many thanks to Carol Lovenstein for the idea.  Click HERE to see Carol's original card.

Click on image for closer look.
Materials

Stamp Set
* Oh, What Fun! (used on inside)

Paper
* Whisper White THICK card stock (8" x 11")
* Merry Little Christmas Designer Series Paper ("DSP") ( 7" x 3")**
* Old Olive card stock (7" x 1-3/4")
* Red Glimmer Paper (about 1-1/4" x 7" for letters; 7" x 1/8" strips; scraps for other shapes)
* Dazzling Diamonds Glimmer Paper (about 4" x 2" for snowflakes)

Ink
* Old Olive Stampin' Write Marker (used on inside)
* Real Red Stampin' Write Marker (used on inside)

Accessories and Tools
* Big Shot Die Cutting Machine
* Large Letters Framelits Dies
* Seasonal Layers Thinlits Dies
* Trim Your Stocking Thinlits Dies**
* Holly Berry Builder Punch
* 1-3/8" Circle Punch
* Adhesives:  SNAIL Adhesive; Multipurpose Liquid Glue

** 2017 Holiday Catalog

Instructions

1. Score 8" x 11" paper at 4" and 8"; fold away from score lines to create 7" x 4" card with an extra 3" flap.  Use 1-3/8" punch to cut a half-circle in center of flap, and then use a thin line of Liquid Glue to adhere outside edges of flap to inside of card to create pocket (see photo below).

2. Use SNAIL Adhesive to adhere 7" x 3" DSP to front of card and to adhere 7" x 1-3/4" Old Olive card stock over DSP.

3. Use Liquid Glue to adhere one 7" x 1/8" strips of Glimmer Paper to card on each side of DSP.

4. Use Big Shot and Large Letters Dies to cut J, O and Y from Red Glimmer Paper.  Use Liquid Glue to Adhere over Old Olive card stock as shown.

5. Use Big Shot and Seasonal Layers Dies to cut 3 small and 1 medium snowflake from Dazzling Diamonds Glimmer Paper.  Use tiny dots of Liquid Glue to adhere to card.

6. Use Big Shot and Trim Your Stocking Dies to cut tiny dots from Red Glimmer Paper.  Use tiny dots of Liquid Glue to adhere to card randomly.  (NOTE:  These were an afterthought because I had them left over from another project -- the card also looks good without them.)

Click on image for closer look.
7.  Paint image on stamp with Stampin' Write markers before stamping on inside pocket.  Use Holly Berry Builder punch to cut one bow and one clump of Holly Berries from Red Glimmer Paper and two Holly Leaves from Old Olive card stock.  Use Liquid Glue to adhere as shown.  (These too were leftovers from a previous project; you can stamp anything on the inside or simply write your own personal message.)

That's it.  A perfect way to

Tuesday, December 19, 2017

Countdown to Christmas Day 19 - Treat Bag

Need an inexpensive last-minute gift?  This is just the ticket!  All you need is a Gift Bag Punch Board, some paper, and some peppermints!  To upscale the gift a little, add a gift card to the bag.

Click on photo for closer look.
Materials

Stamp Set
* Jar of Love

Paper
* Merry Little Christmas Designer Series Paper ("DSP") (10" x 10")**
* Copper Foil Sheets (about 3-1/2" x 3-1/2")
* Old Olive card stock (scraps for holly leaves)
* Red Glimmer Paper (scraps for holly berries)**
* Whisper White card stock (scraps for tag)
* Window Sheets (2-1/2" x 2-1/2")

Ink
* Real Red Classic Stampin' Pad

Accessories and Tools
* Gift Bag Punch Board
* Big Shot Die Cutting Machine
* Swirly Scribbles Thinlits Dies
* Trim Your Stocking Thinlits Dies**
* Holly Berry Builder Punch
* 1-3/4" Circle Punch
* 1/4" Copper Trim
* Adhesives:  Tear 'n Tape; Multipurpose Liquid Glue; Mini Stampin' Dimensionals

Instructions

1. Cut bag according to Punch Board instructions.  I wanted a tall narrow bag, so I used the Small bag marking and cut my paper to 10" in length.

2. Before assembling bag, punch a circle on the front for your contents to show through.  Use Tear 'n Tape to adhere Window Sheet to inside of bag covering circle.

3. Use Big Shot and Copper Foil to cut swirly wreath.  Adhere around circle with Liquid Glue.

4. Use Holly Berry Punch to cut two holly leaves from Old Olive card stock, three holly berries from Red Glimmer Paper, and one bow from Red Glimmer Paper.  Adhere leaves to wreath as shown with Mini Stampin' Dimensionals.  Add berries with dots of Liquid Glue and/or small pieces of Stampin' Dimensionals.

5. Use Tear 'n Tape to assemble bag according to Punch Board instructions.

6. Fill bag with peppermints and fold top to back of bag about 1" from top.

7. Punch holes through all thickeness about 1/2" from each side (I actually cheated here and used my retired Crop-a-Dile).  Thread Copper Trim through holes and tie in a knot in the front to hold bag closed (leave long tails to tie a bow).

8.  Stamp "FOR YOU" on scrap of Whisper White card stock with Real Red ink; use Big Shot and Trim Your Stockings Thinlits Dies to cut tag.  Thread one end of 1/4" Copper Trim through hole in tag and tie in a bow.  If you like, you can pull out the edges of the Copper Trim to make a fun and funky bow like the one shown.

The Gift Bag Punch Board is so flexible -- you can make small bags like the one pictured, or medium or large bags.  You also can adjust the height of the bag to fit your needs.  They make up so fast, you could assemble a bunch of bags to stash away, and then pull them out and embellish them as you use them.

Cathy  ;D

Monday, December 18, 2017

Countdown to Christmas Day 18 - Quilt Builder Dies

As promised, this uses the Quilt Builder Framelits Dies to make something other than a quilt block!  Thanks to Alejandra Gomez for this great design.  Click HERE to see Allie's original card using traditional Christmas colors.

Click on photo for a closer look.
Materials

NO STAMPS!!!!

Paper
* Very Vanilla THICK card stock (8-1/2" x 5-1/2")
* Very Vanilla card stock (about 3-1/4" x 3-1/4" for scalloped square die; about 3" x 1-1/4" for banner)
* Pear Pizzazz card stock (5-1/4" x 4")
* Soft Suede card stock (1/2" x 1/4"; 3/4" x 1/4")
* Painted Autumn Designer Series Paper ("DSP") (about 3" x 3" for square die; about 3" x 1-1/4" for banner)**
* Merry Little Christmas Designer Series Paper ("DSP") (about 2" x 1-1/2" for each tree; about 3" x 1-1/4" for banner)**
* Champagne Foil Sheet (about 3" x 1-1/2" for banner; scraps for bow, star, and joy dies)**

Ink
* Soft Suede Classic Stampin' Pad

Accessories and Tools
* Big Shot Die Cutting Machine
* Quilt Builder Framelits Dies**
* Mini Treat Bag Framelits Dies
* Layering Squares Framelits Dies
* Quilt Top Embossing Folder**
* Stampin' Sponge
* Adhesives:  SNAIL Adhesive; Stampin' Dimensionals; Multipurpose Liquid Glue

** 2017 Holiday Mini Catalog

Instructions
(NOTE: SNAIL Adhesive used throughout unless otherwise indicated.)

1. Score 8-1/2" x 5-1/2" Very Vanilla THICK card stock at 4-1/4"; fold away from score line to create card base.

2. Use Big Shot and embossing folder to add texture to 5-1/4" x 4" Pear Pizzazz card stock.

3. Use Big Shot and Dies to cut the following pieces:
Quilt Builder Framelits Dies
* One Large Quilted Star Shape (including stitched center piece) and two Triangle Shapes from Merry Little Christmas DSP (Old Olive designs)
* One Large Quilted Star Shape (including stitched center piece) and One Square Shape from Painted Autumn DSP (Cajun Craze and Calypso Coral with Very Vanilla dots)* One Large Quilted Star Shape (including stitched center piece) and one Small Star Shape from Champagne Foil Sheet
* One Star Shape (WITHOUT stitched center piece) from Very Vanilla card stock
Layering Squares Framelits Dies:
* One Scalloped Square (largest size in the package) from Very Vanilla card stock
Mini Treat Bag Thinlits Dies
* One Bow and One Enjoy Shape from Champagne Foil Sheet

4. Cut away two cross-pieces on Large Quilted Star Shapes to create banners.  Cut "en" off of "enjoy" to create the word "joy."

5. Those of you who have known me for a while know that it's difficult for me to have a piece of paper in my hands for even a brief amount of time without DOING SOMETHING to it!  So for this card I used a Stampin' Sponge to apply Soft Suede ink around the edges of every piece EXCEPT the foil bow, the foil star, and the foil joy.  Be sure to also apply ink around edges of the card front.  I also lightly brushed the sponge across the Pear Pizzazz embossed card stock to make the embossed design more visible.

Ok . . . now the preliminaries are finished and we can move on to assembling the card . . . WHEW!

6. Adhere Pear Pizzazz embossed card stock to front of card.

7. Make square focal piece:
* Adhere square DSP to Very Vanilla scalloped square. 
* Adhere bases of trees (1/2" x 1/4" and 3/4" x 1/4" Soft Suede card stock) to bottom of DSP as shown.
* Adhere tree on left with SNAIL or Liquid Glue, then use Stampin' Dimensionals to adhere tree on right overlapping the first tree.
* Cut a tiny piece of Stampin' Dimensional to adhere star at top of tree on the right.
* Use Liquid Glue to adhere bow in upper left-hand corner.
* Apply Stampin' Dimensionals to back of square piece, but DO NOT ADHERE TO CARD YET.

8. Position square on front of card without adhering to determine position of banners on right.  Adhere each banner to front of card as shown, and then adhere square over banners.  Use Liquid Glue to adhere joy to Very Vanilla banner.

Lots of steps and lots of pieces, but a fun little card, right?!  Enjoy!

Cathy  ;D


Sunday, December 17, 2017

Countdown to Christmas Day 17 - Christmas Quilt Block

Today's post uses the awesome Quilt Builder Framelits Dies.  The dies and coordinating Quilt Top embossing folder make a beautiful quilted looking square.  Again, I used nontraditional colors.

SPOILER ALERT:  Tomorrow's post will show another way to use this die set to make a cute card that's NOT a quilt block!

Click on photo for closer look.
Materials

Stamp Set
* Musical Season**

Paper
* Basic Black card stock (8-1/2" x 5-1/2"; 3" x 3"; 3" x 1-3/16")
* Whisper White card stock (5-1/4" x 4"; 3-1/8" x 3-1/8"; 3-1/8" x 1-5/16")
* Wild Wasabi card stock (5-1/8" x 3-7/8"; about 3" x 3" for die)
* Gold Foil card stock (about 3" x 3" for quilt block dies; scrap for treble clef)
* Merry Music Specialty Designer Series Paper** ("DSP") (one white design and one black design -- about 3" x 3" of each)

Ink
* VersaMark Ink Pad

Accessories and Tools
* Big Shot Die Cutting Machine
* Quilt Builder Framelits Dies**
* Musical Instruments Framelits Dies**
* Gold Embossing Powder
* Heat Tool
* Adhesives: SNAIL Adhesive; Multipurpose Liquid Glue; Stampin' Dimensionals

** 2017 Holiday Mini Catalog

Instructions
(Unless otherwise indicated, SNAIL Adhesive used for assembly.)

1. Score 8-1/2" x 5-1/2" card stock at 4-1/4"; fold away from score line to create card base.

2. Adhere 5-1/4" x 4" Whisper White card stock to front of card.  Adhere 4-15/16" x 3-11/16" Basic Black card stock over Whisper White card stock.

3. Layer the two pieces of DSP one on top of the other and use Big Shot and die to cut inside pieces of quilt block through both thicknesses.  Cut another set of inside pieces from Wild Wasabi card stock.

4. Cut two gold foil quilt block outlines.  (NOTE:  To cut this shape, you will need to line up quilt block square die inside larger square die.)  Cut one treble clef from gold foil.

5. Use tiny dots of Liquid Glue to adhere gold foil quilt outline to 3" x 3" Basic Black card stock.  Use Liquid Glue to adhere quilt block pieces as shown in photo.

6. Use Big Shot and Embossing Folder to add stitching lines to assembled block.

7. Use Liquid Glue to adhere second gold foil outline over first one.  (NOTE:  You don't necessarily need to add this, but I didn't like the look of the embossed stitches on the gold foil, so I opted to add the clean, non-embossed piece to cover it.)

8. Adhere assembled quilt block to 3-1/8" x 3-1/8" Whisper White card stock.  Adhere to front of card with Stampin' Dimensionals.

9. Use VersaMark to stamp sentiment on 3" x 1-3/16" Basic Black card stock.  Emboss with Gold Embossing Powder and Heat Tool.  Adhere to 3-1/8" x 1-5/16" Whisper White card stock and then adhere to front of card with Stampin' Dimensionals.

10.  Use Liquid Glue to adhere treble clef to card as shown.

I hope you enjoy this card!

Cathy  ;D

Saturday, December 16, 2017

Countdown to Christmas Day 16 - Stocking Gift Card Holder

Good morning!  Today's post is a cute little gift card holder in non-traditional colors.  I don't know if you're like me, but by now I'm already tired of red and green and want to expand into other colors.  (When you're a crafter, holiday projects enter your life WAY EARLIER than other folks -- who are already being bombarded with Christmas stuff before Halloween has come and gone . . . .)

Click on photo for closer look.
Materials

Stamp Set
* Jar of Love

Paper
* Coffee Break Designer Series Paper ("DSP") (about 12" x 4")
* Whisper White THICK card stock (scraps for snowflake and tag)

Ink
* Early Espresso Classic Stampin' Pad

Accessories and Tools
* Big Shot Die Cutting Machine
* Trim Your Stocking Thinlits Dies
* 1/8" Handheld Circle Punch
* 1/8" Sheer Ribbon - Whisper White (about 12")
* Wink of Stella - Clear
* Stampin' Sponge
* Adhesives:  Multipurpose Liquid Glue; Mini Stampin' Dimensionals

Instructions

1. Use Big Shot and Thinlits Dies to cut two each of the stocking, toe patch, heel patch, and cuff.  (NOTE:  To make the front and back of your gift card holder the same color, place two pieces of DSP in the Big Shot with the designs back-to-back.  Since the DSP is so thin, the Thinlits Dies will easily cut through both pieces at the same time.)

2. Cut off the top flaps (oval shapes) at the top of the stocking along the score line.  (NOTE: This die was made with a top closure like a pillow box.  If you want your stocking to be 3D, you can leave the top flaps and complete all the following steps before folding the flaps back to close the box.)

3. Use Stampin' Sponge and Early Espresso ink to apply ink around edges of all pieces.

4. Trace a very thin line of Liquid Glue around outer edges on back piece of stocking -- be sure to leave the top open so you can insert your gift card; line up and adhere front piece to the back.

5. Use Liquid Glue to line up and adhere cuffs, heel patches, and toe patches to front and back of stocking.

6. Use 1/8" Circle Punch to make hole for hanging loop in upper left corner of stocking.  Thread ribbon through hole and tie in a knot to make hanging loop.

7. Use Big Shot and Thinlits Die to cut snowflake from THICK card stock.  Add some shimmer to snowflake with Wink of Stella Glitter Paint.  Adhere snowflake to stocking with Mini Stampin' Dimensionals.  (TIP:  I cut the minis into four pieces to secure the outer points of the snowflake.)

8. Stamp "FOR YOU" on scrap of THICK card stock.  Use Big Shot and Thinlits Die to cut tag.  Use Stampin' Sponge to apply ink around edges of tag.  Adhere to stocking with Liquid Glue.

And as quick as that you have a very sweet little stocking that can be used for a gift and/or business card holder and then later as a holiday tree ornament!

Cathy  ;D

Friday, December 15, 2017

Countdown to Christmas Day 15 - Seasonal Layers

The design for this simple yet elegant card came from Jan Brown, a Stampin' Up! demonstrator in the UK.  Click HERE to view Jan's original card done in Elegant Eggplant.  I wanted a more mellow feel to my card, so I used Tranquil Tide.

Click on photo for closer look.
Materials

NO STAMPS!!!  NO INK!!!

Paper
* Tranquil Tide card stock (8-1/2" x 5-1/2"; 5-1/8" x 3-7/8")
* Shimmery White card stock (5-5/16" x 4-1/16"; scraps for dies)

Accessories and Tools
* Big Shot Die Cutting Machine
* Seasonal Layers Thinlits Dies
* Mini Treat Bag Thinlits Dies
* Rhinestone Basic Jewels (medium size)
* White Chalk Marker
* Adhesives:  SNAIL Adhesive; Multipurpose Liquid Glue

Instructions

1. Score 8-1/2" x 5-1/2" card stock at 4-1/4"; fold away from score line to create card.

2. Adhere 5-5/16" x 4-1/16" Shimmery White card stock to front of card.

3. Adhere 5-1/8" x 3-7/8" Tranquil Tide card stock to Shimmery White card stock.

4. Use Big Shot and Seasonal Layers Thinlits dies to cut branch and three small snowflakes from Shimmery White card stock.  Use Mini Treat Box Thinlits to cut "enjoy," then cut off the "en" leaving just "joy."

5. Use tiny dots of Liquid Glue to adhere branch (I cut a tiny corner off the right end so I could line it up with the edge of the card stock), the three snowflakes, and joy as shown.

6. Use Chalk Marker to draw thin lines from the branch to the top of each snowflake making them appear as if they were hanging from the branch.

7. Place a self-adhesive Rhinestone in the center of each snowflake.

. . . and you're finished!  This was seriously the easiest card I've ever made, but I love the look of it!

Cathy  ;D

Thursday, December 14, 2017

Countdown to Christmas Day 14 - Glow in the Dark Card

This beautiful card was created by Mi Ran Bigrigg as her Christmas gift to others this year.  I didn't purchase this die, but wanted to share the card with you because it's so inventive and beautiful!  Click HERE to visit Mi Ran's site and view the details.


. . . whew!  And now I'm caught up to today.  Watch for another Christmas idea tomorrow!

Cathy  ;D


Countdown to Christmas Day 13 - Faux Patina Technique

This morning I'm sharing with you a beautiful masculine card that kind of qualifies as Christmas -- at least it's wintry-looking . . . and the technique is wonderful!

Click on photo for closer look.

Right off the bat I'll admit I did not make this card -- it was posted on Pinterest from Splitcoaststampers.com.  The technique used is called Faux Patina.  Click HERE to view the tutorial for this technique.

The materials listed for this card are:

From Stampin' Up! 
* Birthday Banners stamp set
* Soft Suede, Basic Black, and Crumb Cake card stock
* VersaMark Ink
* Gold Embossing Powder

Other 
Deer Dies (unknown source)

It also looks to me like the deer are cut from the Brushed Gold card stock that Stampin' Up! used to sell, so if you still have some in your stash that should work well for this design.

If you try this technique, I'd be interested in hearing how it goes.  I plan to try it soon!

Cathy  ;D


Wednesday, December 13, 2017

Countdown to Christmas Day 12 - Candy Cane Reindeer

Many thanks to my friend Shannon Bedingfield, another Stampin' Up! demonstrator, for this cute idea!  What a great quick and easy stocking stuffer!

Click on photo for closer look.
Materials

Paper
* Crumb Cake card stock (11" x 2")
* Red Glimmer Paper (scrap for nose)
* Whisper White card stock (scraps for eyes)
* Basic Black card stock (scraps for eyes)

Accessories and Tools
* Scalloped Tag Topper Punch
* Owl Builder Punch
* 1/2" Circle Punch
* White Chalk Marker
* 3/8" Ribbon (about 3")
* Silver Baker's Twine (about 6")
* Adhesive: Multipurpose Liquid Glue; Glue Dots

Miscellaneous Items
* 2 Candy Canes (about 5-3/4")

Instructions

1. Score 11" x 2" card stock at 2-1/2" and 5-1/4".  Fold into a "Z" on score lines.  Punch both ends of card stock with Scalloped Tag Topper Punch.

2. Use Glue Dots to adhere candy canes to base as shown just above 5-1/4" score line.  Apply liquid glue or other strong adhesive along each side of next section of card stock; fold back up over candy canes and adhere edges to top section to create pocket.

3.  Use Owl Builder Punch to punch two large circles from Whisper White card stock; punch two smaller circles from Basic Black card stock.  Use Glue Dots or Liquid Glue to adhere circles to front flap, creating eyes.  Use Chalk Marker to add highlights to black parts of eyes.

4. Punch 1/2" Circle from Red Glimmer Paper.  Use Glue Dots or Liquid Glue to adhere to front flap as shown for nose.

5. Thread 3/8" ribbon through hole in top of tag; secure by tying two ends together with Silver Baker's Twine.  Tie ends of twine into a knot or bow as shown.

That's it!  Hope you enjoy this cute idea!

Cathy  :D

Countdown to Christmas Day 11 - Table Favors

These are the cutest little table favors.  I got this idea from Sandra Ronald, a Stampin' Up! demonstrator in the UK.  Click HERE to view her video tutorial.

Click on photo for closer look.
Materials

Stamp Sets
* Santa's Sleigh
* Oh What Fun

Paper
* Coffee Break Designer Series Paper ("DSP) (5" x 5")
* Crumb Cake card stock (about 3" x 3" for reindeer; see note below)
* Cherry Cobbler card stock (scraps for berries and bow)
* Whisper White card stock (about 3" x 1-1/2" for banner)

Ink
* Cherry Cobbler Classic Stampin' Pad
* Early Espresso Classic Stampin' Pad
* Early Espresso Stampin' Marker (Optional)

Accessories and Tools
* Envelope Punch Board
* Big Shot Die Cutting Machine
* Santa's Sleigh Thinlits Dies
* Duet Banner Punch
* Holly Berry Builder Punch
* Wink of Stella
* White Stampin' Chalk Marker
* 1/8" Gold Ribbon
* Stampin' Sponge
* Bone Folder
* Adhesives:  Multipurpose Liquid Glue; Stampin' Dimensionals

Instructions

Assemble basic treat holder
(NOTE:   Watching the video tutorial will be the best way to figure out how to assemble treat holder, but if you don't want to do that, I'll attempt to describe in Steps 1 and 2 how it was done.)

1. Using Envelope Punch Board, line up DSP at 2", punch and score; turn paper 180 degrees and repeat.  Line up score line on remaining two sides with the guide on the punch board, punch and score.

2. Fold flaps on three sides to the front; fold fourth flap (short edge) to back and glue down (this will be the top).  Use Bone Folder to slightly bend three flaps (you want to create a pouch that will accommodate the size of the contents), put your treat on center rectangle and fold up bottom flap.  Add a dot of liquid glue at top corner of bottom flap and fold left side flap over it.  On inside of right flap, add a drop of glue at corner fold over the left flap.  Now you have your basic treat bag.

Embellishments

3. Use Holly Berry punch to punch several berries from Cherry Cobbler card stock.  Adhere to DSP over a few of the coffee beans on the DSP.  Use White Chalk Marker to add highlight dots.

4. Wrap ribbon around treat holder near top opening and tie in a bow in front.

5. Use Cherry Cobbler ink to stamp Merry Wishes on Whisper White card stock.  Punch out with Duet Banner Punch.  (NOTE:  This is a photopolymer stamp, so before stamping, I was able to bend it slightly downward at outer edges to accommodate shape of punch.)  Use Stampin' Sponge to apply Early Espresso ink around outer edges of shape.  If you like, you also can use the Early Espresso marker to draw folds on banner.  Use small pieces of Stampin' Dimensionals to adhere banner to treat holder above bow.

6. Use Early Espresso ink to stamp reindeer image on Crumb Cake card stock, and also to stamp bow image on Cherry Cobbler card stock.  Use Big Shot and Thinlits Dies to cut out images.  (*NOTE:  In her video Sandra was having a difficult time getting her favor to stand up, so I actually cut three extra unstamped reindeer shapes and glued them behind the stamped shape to create a sturdier piece.)  Glue bow to reindeer as shown.  Use Wink of Stella to add a little glimmer to bow and hooves.

7. Use Stampin' Dimensionals to adhere reindeer to front of treat holder.  (NOTE:  I found it helpful to hold the treat holder in an upright position as I was adding the reindeer.  I also already had the chocolates in the treat holder.  This allowed me to make sure the reindeer's feet were touching the work surface and they would support the weight of the contents.) 

That's it!  The steps make it sound like a lot of work, but believe me, once I decided what paper and embellishments I wanted to use, it took only 20 minutes to make from start to finish!  This would be a sweet table decoration for your holiday dinner.  I put Hershey's Nuggets in my sample simply because that's what I had -- I think Ghirardelli squares also would fit nicely.

Enjoy!

Cathy :D

Tuesday, December 12, 2017

Countdown to Christmas Day 10 - Blast from the Past!!!

Today's project is actually a card I created more than four years ago.  One of my customers recently spotted one of my few remaining cards in this design and asked me how to make it (she had all the materials, but I apparently hadn't posted instructions at the time).  I don't recall if this was a class project or (more likely) a swap card.  In any event, it's one of my personal favorites and I'm quite disappointed in myself that I sold the stamp set in one of my great purges!

The stamp set and some of the items used to make this card are no longer sold by Stampin' Up!  Hopefully you still have some of these items in your collection -- and the technique used to color the poinsettia is timeless.

Click on image for closer look.
Materials

Stamp Set
* Joyful Christmas (featured in 2013 Holiday Catalog)

Paper
* Cherry Cobbler card stock (8-1/2" x 5-1/2"; 5-1/4" x 4")
* Very Vanilla card stock (about 5-1/4" x 3")
* Shimmery White card stock (about 3-3/4" square)

Ink
* Early Espresso Classic Stampin' Pad
* VersaMark Ink Pad
* Gold Metallic Ink Pad (no longer sold by Stampin' Up!)
* Cherry Cobbler Refill Ink

Accessories and Tools
* Big Shot Die Cutting Machine
* Apothecary Accents Framelits Dies (Stampin' Up! - Retired)
* Stylish Stripes Embossing Folder (Stampin' Up! - Retired)
* Gold Embossing Powder
* Heat Tool
* Aqua Painter (or paint brush)
* Stampin' Spritzer
* Stampin' Sponge
* Rhinestone Basic Jewels
* Adhesives: SNAIL Adhesive; Stampin' Dimensionals

Instructions
(NOTE:  SNAIL Adhesive used throughout unless otherwise indicated)

1, Score 8-1/2" x 5-1/2" card stock at 4-1/4"; fold away from score line to create card base.

2. Use Big Shot and embossing folder to add textured stripes to 5-1/4" x 4" Cherry Cobbler card stock.  Use Stampin' Sponge to apply Early Espresso ink around edges, then scrape all of the edges across gold ink pad to add a gilt look.  Adhere to front of card.

3. Use Big Shot and die to cut shape from Very Vanilla card stock.  Stamp sentiment with VersaMark ink and emboss with Gold Embossing Powder.  Use Stampin' Sponge to apply Early Espresso ink around edges.  Center and adhere to front of card.

4. Stamp poinsettia image on Shimmery White card stock with VersaMark ink pad; emboss with Gold Embossing Powder.  Use Stampin' Spritzer or other spray bottle filled with water to spray water across stamped and embossed image.  (NOTE:  You want this to be almost "puddly" wet for this technique to work.)  Using Aqua Painter or wet paint brush, pick up a tiny dot of Cherry Cobbler refill ink and drop onto surface of water.  You will immediately see the ink spread across the water, leaving darker spots in some places, and lighter in other areas.  If you like, you also can use your brush to spread out the ink.  Repeat until entire image is covered with color.  At this point you can either air dry or use heat tool to dry the water and ink.  Once paper is completely dry, cut out image and adhere to the front of the card as shown with Stampin' Dimensionals.

5. Add several small Rhinestones to center of poinsettia.


For the inside of the card, cut a 5-1/4" x 4" piece of Very Vanilla card stock.  Use VersaMark ink to stamp a portion of the poinsettia in the upper left-hand corner; emboss with Gold Embossing Powder.  Stamp the sentiment with Basic Black ink.  Use Stampin' Sponge to apply Early Espresso ink around outside edges.

That's it.  You could use this technique for any image -- it's particularly good for flowers -- makes the petals look so realistic!

Cathy  ;D

Countdown to Christmas Day 9 Ribbon Box

Isn't this the sweetest little trinket box?!  I spotted it on Splitcoaststampers.com and thought it was the coolest way to use empty ribbon spools.  And, being a total hoarder -- er, RECYCLER -- of COURSE I have a few of these stashed somewhere.  I knew some day I would find a use for them -- even if it was just to rewind old ribbon scraps.

I must admit I haven't yet made one, but am definitely planning to do that once the hubbub of the holidays dies down.


Click HERE for detailed directions and a video.  NOTE:  If for some reason this link doesn't work, visit SplitCoastStampers.com and click on the Tutorials link.  This project is called "Tape Roll Trinket Box."

Cathy  ;D

Sunday, December 10, 2017

Stampin' Up! FREE SHIPPING on Monday, December 11


Just a quick message to let you know that Stampin' Up! is offering another free shipping date on Monday, December 11.  That's like saving 10% on your order!!!!

Click on image above to shop my online store, or contact me to place your order (I generally go to bed early and get up early, so please let me know by 8 p.m. on Monday, the 11th, if you want me to order for you).

Cathy  ;D

Countdown to Christmas Day 8 - Winter Card

Here's the card we made at my table at Stamp Camp West yesterday -- it's not so much Christmas as it is an all-encompassing seasonal card.

Click on image for closer look.
Materials

Stamp Set
* Holly Berry Happiness

Paper
* Basic Gray card stock (8-1/2" x 5-1/2"; scrap for deer)
* Whisper White card stock (5-1/4" x 4"; 3-7/8" x 3-1/4")
* Merry Little Christmas Designer Series Paper (2017 Holiday Catalog) (3-7/8" x 2-1/2")
* Pear Pizzazz card stock (approximately 2-1/4" x 2")
* Silver Foil Paper (approximately 2-1/4" x 1-1/2")

Ink
* Smoky Slate Classic Stampin' Pad
* Tuxedo Black Memento Ink or Basic Black Archival Ink Pad

Accessories and Tools
* Big Shot Die Cutting Machine
* Card Front Builder Die (2017 Holiday Catalog)
* Rhinestones Jewels (small size)
* Stampin' Sponge
* Adhesives:  SNAIL Adhesive; Mini Stampin' Dimensionals; Multipurpose Liquid Glue

Other
* Template made from cardboard.  See note below.

Instructions
(NOTE:  SNAIL Adhesive used throughout unless otherwise indicated)

1. Score 8-1/2" x 5-1/2" card stock at 4-1/4"; fold away from score line to create card base.

2. Adhere 5-1/4" x 4" Whisper White card stock to front of card.

3. Adhere DSP near top edge of Whisper White card stock (about 1/16" away from each side and the top).

4. Make template out of scrap card stock or cardboard (I used an empty cereal box).  It doesn't need to look exactly like mine (see photo), but it does need to have a gentle curve along the bottom.


The photo below shows the pieces parts for this card.  NOTE:  For the stamp camp, since I was cutting pieces for a LOT of cards, I wanted to conserve as much DSP as possible, so I cut the curved edge on both the DSP and the Whisper White card stock.  Since you probably won't be making 70+ cards, you do not necessarily need to do that -- you can just use a rectangular piece of DSP that's about 2-1/2" long and then cut the curved top edge on the Whisper White card stock as detailed below.


5. To create curved edge on Whisper White card stock, trace curved edge of template at top of paper.  Cut along traced line.

6. To create hills, place curved edge of template where the bottom of the silver foil tree will be positioned on the card.  Use Stampin' Sponge and Smoky Slate ink to daub ink along the curved edge of the template.  Move the template up slightly and repeat to create the hill where the Pear Pizzazz trees will be positioned.  (See photos below.)


This is what the piece should look like after you've finished sponging the hills.


7. Use Stampin' Sponge to apply ink along outer edges of curved Whisper White card stock.

8. Use Memento Ink to stamp sentiment near bottom left of curved Whisper White card stock.  Adhere to front of card about 1/16" from bottom edge of Whisper White card stock and overlapping the DSP at the top.

9. Use Big Shot and die to cut the two trees shape from Pear Pizzazz card stock.  Use Liquid Glue to adhere to card aligning the bottom of the trees with the top hill.

10. Use Big Shot and die to cut single tree shape from Silver Foil card stock.  Use Mini Stampin' Dimensionals to adhere to card, aligning the bottom of the tree with the bottom hill.

11. Use Big Shot and die to cut deer from Basic Gray card stock.  Use small amount of Liquid Glue to adhere deer under left edge of silver foil tree as shown.

12. It's kind of hard to see in the photo above, but if you click on the photo to enlarge it, you should be able to spot the three small rhinestone jewels in the sky adding just a hint of a sparkle to the card.

Don't forget the inside . . . .

You may have noticed there is an extra single tree in the pieces parts photo . . . that piece was cut from Smoky Slate to add to the inside of the card.

Sorry about the shadow across the lower left edge of this photo . . . that's me taking the picture with my iPhone!

If you have a stamp with a small sprinkle of snowflakes (the one pictured here is from Tags and Trimmings (2017 Holiday Catalog)), adding a few snowflakes around the tree with Smoky Slate ink provides just the right touch to the inside.

Hope you enjoy this card!

Cathy  ;D

Countdown to Christmas Day 7 (kind of)

I'm so far behind on my countdown!  Trying to catch up today by cheating a little . . . yes, it's another recipe because I'm not quite ready to post the instructions for the card we made at my table at yesterday's stamp camp.  My food assignment for this special holiday stamp camp was turkey and stuffing.  You would have laughed out loud if you had seen me dancing with the 23+ pound oiled-up turkey trying to get it into the oven bag at 2:30 a.m.  But ultimately I won the battle and the turkey came out perfect as always -- moist and delicious!


The recipe I'm posting is for the AWESOME stuffing I made to go with the turkey.  Several people commented on how good it was and asked for the recipe.  Funny because I just found it online* last week and made it IN A CROCKPOT!!!!  We had a large group to feed, so I actually made two batches -- had two crockpots and the oven going in the wee hours of the morning.

Slow Cooker  Sausage, Apple and Sage Stuffing

Ingredients

  • 12 cups dried bread cubes (approximately 1 loaf of bread)
  • 8 ounces ground pork or turkey sausage (I used pork sausage with sage)
  • 4 tablespoons butter, melted
  • 1-1/2 cups Granny Smith green apples, chopped (no need to peel)
  • 1-1/2 cups chopped onion
  • 1-1/2 cups chopped celery
  • 2 teaspoons finely chopped fresh sage (since I didn't have fresh sage, and the sausage already had sage in it, I used only 1 teaspoon of ground sage)
  • 1 teaspoon salt
  • 1/2 teaspoon pepper
  • 1/2 cup chicken broth, plus 1/4 cup, if desired, for additional moisture

Instructions

Brown the sausage, drain and place in the bottom of a slow cooker (6 quart or larger).  Stir in the bread cubes.  Pour in melted butter and toss together with sausage and bread cubes.

Place chopped apples, onion, celery, sage, salt and pepper over mixture, pour in 1/2 cup of chicken broth, and toss everything together using two large spoons.

Cover and cook on high for 2-3 hours or until the bread is browned on top and vegetables are tender.  Before serving you can stir in 1/4 cup extra broth, if desired, for extra moisture.

NOTES

1. I put this in the crockpot around 3:15 a.m. (wanted to have fresh, hot stuffing to take with me in the morning) and went back to sleep.  Got up at 6 a.m. and checked on it and it was a little burnt around the edges.  I think next time I'll let it cook for 2 hours and then check to see how it's doing.

2. To transport and place this on the buffet table at stamp camp, I placed the stuffing in several aluminum containers and covered each one tightly with aluminum foil.  I also did this with the turkey.  Placed all the containers in a large roaster oven and turned it on to about 150 degrees to keep everything warm.  It worked well -- everything stayed warm, didn't burn, and was moist.

If you decide to try this recipe I'd be interested in knowing if you like it as well as the campers did!

Cathy  ;D

* Recipe from Boys Ahoy by Kristy Denney, who cited A Year of Slow Cooking as her source.

Wednesday, December 6, 2017

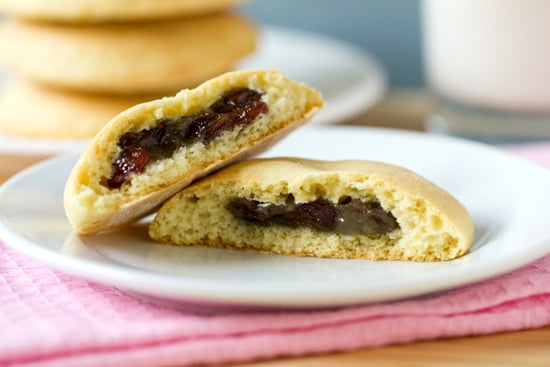
Countdown to Christmas Day 6 - Aunt Lena's Filled Cookies

Today (or more accurately, tonight) I'm sharing with you an old family recipe for some awesome filled cookies.  I used to make these as Christmas gifts for my friends, but since I don't like raisins or dates, I never actually tried them myself!  Then one day I thought, what the heck -- everyone begs me to make these cookies -- I should try them to see what all the fuss is about.  I discovered that they're REALLY GOOD!!!!  DESPITE the raisins and dates!!!!


Aunt Lena's Filled Cookies


Ingredients

Dough
  • 2 eggs, beaten
  • 2 cups sugar
  • 1-1/2 cups shortening
  • 1 cup sour milk*
  • 1 teaspoon baking soda
  • 2 teaspoons baking powder
  • 1 teaspoon nutmeg
  • 5 cups flour
* If you don't have sour milk, just add a little vinegar to some fresh milk.

Filling
  • 1/2 cup sugar
  • 1/2 cup water
  • 1 tablespoon flour
  • 1 cup chopped raisins, dates or nuts (I actually combine all three in my cookies)
Instructions

Combine all cookie ingredients except flour, and stir until well blended.  Stir in flour, one cup at a time, to form a soft dough.  Mix filling ingredients together and cook over low heat until thick.  On floured surface, roll cookie dough to about 1/4" thickness.  Use cookie cutter or top edge of glass to cut out 2" diameter circles.  Place about 1 teaspoon of the filling in the center of one circle.  Dab raw egg yolk around edge of circle, then top with another circle.  Crimp or press fork into the dough around the edges to hold the top and bottom together.  Bake on ungreased cookie sheet at 350 degrees for about 12 minutes.

NOTE:  You will probably use three batches of filling before you run out of the cookie dough, but because the dough is so good by itself, I often use the extra dough to make Christmas cut-out cookies (reduce baking time to 8 minutes), and then frost them with powdered sugar icing.

Yes, they are kind of a pain to make, but so worth it!  I hope you try them.

Cathy  ;D

P.S.  Since yesterday's post was really not a countdown-worthy post, but rather just an announcement, I'll try to make up for it with an extra one over the weekend.  

Tuesday, December 5, 2017

Stamparatus Reserve Ordering Begins Today!

Howdy, folks!  By now I'm sure you've heard of the new stamp positioning tool developed by Stampin' Up! -- the Stamparatus.  This item will be featured in the new 2018-2019 Annual Catalog, but now you have a chance to reserve one and receive it before that catalog is released in June 2018.

Here's the scoop:

First, click HERE to view the video so you can see what the hullabaloo is all about.

Second, visit www.stampinup.com and click on the link to reserve your Stamparatus.  You will need to have your credit card number available when you order, although it won't be charged until the item ships next year.  Stampin' Up! will accept all reserve orders until December 30, 2017, but you will want to order yours soon -- orders will be filled beginning March 19, 2018, but will not all be shipped at once -- rather, they will be shipped in batches as new shipments arrive (the next shipment after March 19, is expected to arrive April 15).

Click on image for closer look.


IMPORTANT NOTE:  I CANNOT RESERVE A STAMPARATUS FOR YOU.  Demonstrators are limited to only one item on this reserve order, and no more.  Therefore, you will need to create an online account if you don't have one, or wait until the item appears in the 2018-2019 Annual Catalog to order yours.

Cathy