 |
| Click on image for closer look. |
This design was inspired by a card maker in Grand Junction, Colorado. I don't know her name (it doesn't appear on her blog), but she sure has made lots of great cards. Below is her original card -- as you can see, mine doesn't really look at all like hers, but this was my starting point and inspiration.
 |
| Visit this blog to see details. |
Materials
Paper
* Tranquil Tide card stock (8-1/2" x 5-1/2"; scrap for "hope" die)
* Pool Party card stock (5-1/4" x 4"; about 5-1/2" x 4-1/4" for die cuts and circle punch)
* Whisper White card stock (5" x 3-3/4"; about 2" square for circle punch)
* Soft Sky card stock (4-7/8" x 3-5/8")
Ink
* Tranquil Tide Refill Ink
Accessories and Tools
* Big Shot Die Cutting Machine
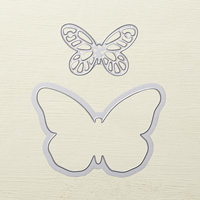
* Bold Butterfly Framelits Dies
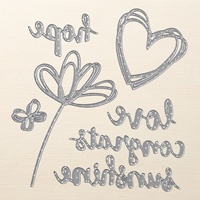
* Sunshine Wishes Thinlits Dies (hope)
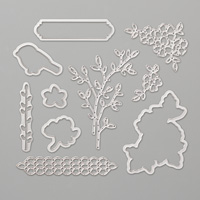
* Petals and More Thinlits Dies (2018 Occasions catalog - leaves)
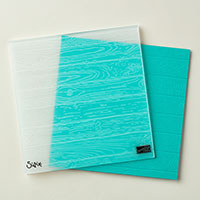
* Pinewood Planks Dynamic Embossing Folder
* 2" Circle Punch
* 2-1/4" Circle Punch
* Aqua Painter (filled with water and several drops of refill ink)
* Pearl Basic Jewels
* Adhesives: SNAIL Adhesive; Multipurpose Liquid Glue
Instructions
1. Score 8-1/2" x 5-1/2" card stock at 4-1/4"; fold away from score line to create card base.
2. Adhere 5-1/4" x 4" Pool Party card stock to front of card; adhere 5" x 3-3/4" card stock over Pool Party.
3. Use Big Shot and Embossing Folder to add woodgrain texture to Soft Sky card stock; adhere over Whisper White card stock.
4. Cut shapes as follows:
* From Pool Party card stock, punch one 2-1/4" Circle. Use Big Shot and Thinlits/Framelits Dies to cut butterfly and leaves.
* From Whisper White card stock, punch one 2" Circle.
* From Tranquil Tide use Big Shot and Thinlits Die to cut "hope."
5. Use Aqua Painter filled with water and refill ink to splash a little color onto 2" Whisper White circle.
NOTE: I don't know exactly how much refill ink I added to the water, but just kept testing it and adding a few more drops until I obtained the shade I wanted. I did this because I had lots of stampers making this card at the stamp camp. To make just one card, an easier -- and probably less wasteful -- way to do it is to simply add a dot of refill ink to a flat non-porous surface (I use stampin' blocks). Then get some water into the brush of your Aqua Painter and pick up some ink to mix with the water in the brush. To splatter the ink, I use a Bone Folder to tap the solid part of the Aqua Painter right around the area where the brush screws into the reservoir. Be careful to move everything else out of the way, though -- sometimes the splatters can be unpredictable!
6. To assemble the rest of the card, I used Multipurpose Liquid Glue (the one with the green cap). Assemble as follows:
* Center and glue 2" Whisper White circle onto 2-1/4" Pool Party Circle; glue 2-1/4" circle to front of card as shown above.
* Apply tiny drops of glue to the solid leaves and the bottoms of the two stems and adhere leaves as shown.
* Apply glue to thick part of letters and apply "hope" to card as shown.
* Place your thumbnail next to the body of the butterfly at the base of the wing and fold back slightly -- do this for each wing. Apply glue just to the body and adhere to card as shown.
7. The final step is to add a few self-adhesive Pearl Basic Jewels to the body of the butterfly.
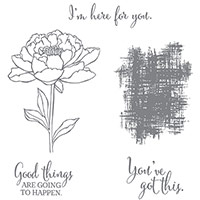
Stampin' Up! also has some great stamps for the inside of this card. On my sample I used Tranquil Tide ink to stamp one of the sentiments from the "You've Got This" stamp set. Then I used Pool Party ink to stamp a couple of small butterflies from the Butterfly Basics stamp set. Finally, just because I could, I splattered a little more of the Tranquil Tide water and ink solution from my Aqua Painter.
That's it! A great card to use for sympathy, get well, or just a little encouragement when a friend is going through a rough patch.
NOTE: I'm trying out something new. I belong to an online Stampin' Up! Demo group (SUDSOL) that has a tool I can use to add photos of the products I've used for my projects. So below I've added information for the embossing folder, dies and stamp sets I used to make this card. I hope you like this feature. If so, I'll continue using it.
Cathy ;D
* Tranquil Tide card stock (8-1/2" x 5-1/2"; scrap for "hope" die)
* Pool Party card stock (5-1/4" x 4"; about 5-1/2" x 4-1/4" for die cuts and circle punch)
* Whisper White card stock (5" x 3-3/4"; about 2" square for circle punch)
* Soft Sky card stock (4-7/8" x 3-5/8")
Ink
* Tranquil Tide Refill Ink
Accessories and Tools
* Big Shot Die Cutting Machine
* Bold Butterfly Framelits Dies
* Sunshine Wishes Thinlits Dies (hope)
* Petals and More Thinlits Dies (2018 Occasions catalog - leaves)
* Pinewood Planks Dynamic Embossing Folder
* 2" Circle Punch
* 2-1/4" Circle Punch
* Aqua Painter (filled with water and several drops of refill ink)
* Pearl Basic Jewels
* Adhesives: SNAIL Adhesive; Multipurpose Liquid Glue
Instructions
1. Score 8-1/2" x 5-1/2" card stock at 4-1/4"; fold away from score line to create card base.
2. Adhere 5-1/4" x 4" Pool Party card stock to front of card; adhere 5" x 3-3/4" card stock over Pool Party.
3. Use Big Shot and Embossing Folder to add woodgrain texture to Soft Sky card stock; adhere over Whisper White card stock.
4. Cut shapes as follows:
* From Pool Party card stock, punch one 2-1/4" Circle. Use Big Shot and Thinlits/Framelits Dies to cut butterfly and leaves.
* From Whisper White card stock, punch one 2" Circle.
* From Tranquil Tide use Big Shot and Thinlits Die to cut "hope."
5. Use Aqua Painter filled with water and refill ink to splash a little color onto 2" Whisper White circle.
NOTE: I don't know exactly how much refill ink I added to the water, but just kept testing it and adding a few more drops until I obtained the shade I wanted. I did this because I had lots of stampers making this card at the stamp camp. To make just one card, an easier -- and probably less wasteful -- way to do it is to simply add a dot of refill ink to a flat non-porous surface (I use stampin' blocks). Then get some water into the brush of your Aqua Painter and pick up some ink to mix with the water in the brush. To splatter the ink, I use a Bone Folder to tap the solid part of the Aqua Painter right around the area where the brush screws into the reservoir. Be careful to move everything else out of the way, though -- sometimes the splatters can be unpredictable!
6. To assemble the rest of the card, I used Multipurpose Liquid Glue (the one with the green cap). Assemble as follows:
* Center and glue 2" Whisper White circle onto 2-1/4" Pool Party Circle; glue 2-1/4" circle to front of card as shown above.
* Apply tiny drops of glue to the solid leaves and the bottoms of the two stems and adhere leaves as shown.
* Apply glue to thick part of letters and apply "hope" to card as shown.
* Place your thumbnail next to the body of the butterfly at the base of the wing and fold back slightly -- do this for each wing. Apply glue just to the body and adhere to card as shown.
7. The final step is to add a few self-adhesive Pearl Basic Jewels to the body of the butterfly.
 |
| Click on image for closer look. |
That's it! A great card to use for sympathy, get well, or just a little encouragement when a friend is going through a rough patch.
NOTE: I'm trying out something new. I belong to an online Stampin' Up! Demo group (SUDSOL) that has a tool I can use to add photos of the products I've used for my projects. So below I've added information for the embossing folder, dies and stamp sets I used to make this card. I hope you like this feature. If so, I'll continue using it.
Cathy ;D

No comments:
Post a Comment