 |
| Click on photo for closer look. |
Materials
Stamp Set
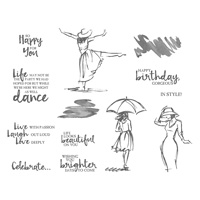
* Beautiful You 🎶 (see below)
Paper
* Sahara Sand card stock (8-1/2" x 5-1/2)
* Very Vanilla card stock (5-1/4" x 4")
* Blushing Bride card stock (5-1/8" x 3-7/8")
* Falling in Love Designer Series Paper 🎶 (5" x 3-1/2")
Ink
* Tip Top Taupe Classic Stampin' Pad
* Blushing Bride Classic Stampin' Pad
* Black Memento Pad
Accessories and Tools
* Lace Doilies 🎶
* Stampin' Sponge
* Watercolor Pencils 🎶
* Blender Pen or Aqua Painter
* Very Vanilla 1/2" Lace Trim (about 6")
* Linen Thread (about 8")
* Adhesives: SNAIL Adhesive and Glue Dots
🎶 Find these items in the 2017 Occasions Mini Catalog
Step-by-Step
(SNAIL Adhesive was used to assemble this card unless otherwise indicated.)
1. Score 8-1/2" x 5-1/2" Sahara Sand card stock at 4-1/4"; fold away from score line to create card base.
2. Center and adhere Very Vanilla card stock on front of card. Center and adhere Blushing Bride card stock over Very Vanilla card stock.
3. Place Lace Doily over Designer Series Paper (DSP) and using it as a stencil, lightly sponge Tip Top Taupe over the doily. If you look closely at the photo, you'll see I did this in a couple of places. Then randomly sponge more ink over DSP until you're happy with how it looks.
4. Use Memento Ink to stamp image and sentiment on DSP. Use Watercolor Pencils to color image (I used Calypso Coral very lightly for arms and legs and heavier for dress; Melon Mambo for darker shading on dress; Daffodil Delight for hat; and Early Espresso for shading on hat).
OPTIONAL STEP: Just coloring in the image looks great, but if you want more of a watercolor look, you can paint over the colors with a Blender Pen or Aqua Painter to smooth out the shading. One of my demonstrator buddies told me if you use the Aqua Painter (or a small paint brush with water), you can go back with the watercolor pencil to intensify the color if it's not as dark as you want it to be; I have found you also can do this with the Blender Pen, but the colors may not be as deep and rich. (Blender Pens contain a combination of glycerin, distilled water, and rubbing alcohol, which may not accept additional color quite as well.)
5. Place Lace Trim horizontally near bottom of DSP (about 1/4" from the edge) and adhere ends on back of paper. Adhere DSP to front of card over Blushing Bride card stock.
7. Cut about 8" of Linen Thread. Fold or cut the thread in half and use the double-thickness to tie a knot around the Lace Trim, and then cut the tails to the length you want. Secure to front of card with a Glue Dot behind the knot.
Don't forget about the inside of the card!!!
 |
| Click on photo for closer look |
If you look closely, you'll see that I added some very faint doily shading on the inside of the card. To get this faded out result I barely touched the sponge to the paper. I stamped the sentiment with Memento Ink and highlighted it with a splash of Blushing Bride ink (the stamp for this splash of color is also included in the Beautiful You stamp set).
That's it! An elegant card for any occasion!
Cathy ;D
|
|


No comments:
Post a Comment