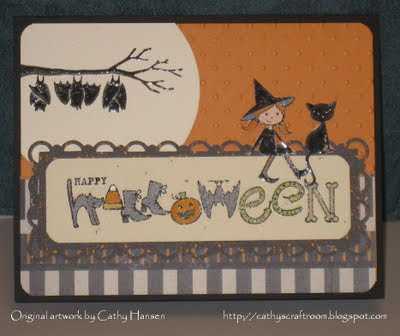
Halloween for me marks the beginning of the holiday season -- my favorite time of the year! So I decided to begin a little early and do a Halloween card for my 2011 Holiday Mini Swap.
My stamp set for this swap was Fun & Festive. But I couldn't resist adding a few images from Out on the Limb too . . . . The Designer Series Paper is also from the Holiday Mini -- Pick Your Poison.
Oh, by the way . . . here's the inside:

Materials:
Stamp Sets:
* Fun & Festive**
* Out on a Limb**
* Halloween Hang-Ups Jumbo Wheel** (inside)
Paper:
* Card stock: Basic Black (8-1/2" x 5-1/2"), Peach Parfait (5-1/4" x 4"), Very Vanilla (5-1/4" x 4" for inside; about 3" x 3" for moon; scraps for witch & cat), Naturals Ivory (4-1/4" x 1-1/4")
* Designer Series Paper ("DSP"): Pick Your Poison** (I think the black & orange piece is 4-9/16" x 1-7/8", but I'm going to measure it again this evening; the stripe piece at the bottom of the card is 5-1/4" x 1-3/4"; the striped piece inside the card is 5-1/4" x 3/8")
Ink:
* Basic Black Craft Stampin’ Pad
* Basic Gray Classic Stampin’ Pad (inside)
* Stampin’ Write Markers: Basic Gray, Blush Blossom, Certainly Celery, Peach Parfait, Sahara Sand, So Saffron, Wisteria Wonder
Accessories:
* Big Shot Die Cutting Machine
* Perfect Polka Dots textured impressions embossing folder
* 3” Circle Die
* Scallop Trim Border and Corner Punches
* 3/16” Corner Punch
* Clear Embossing Powder and Heat Tool
Adhesives:
* SNAIL Adhesive
* Stampin’ Dimensionals
* Sticky Strip
* Two-Way Glue Pen
** 2011 Holiday Mini Catalog
Instructions:
(Unless otherwise noted, SNAIL Adhesive was used to assemble card.)
1. Score Basic Black card stock at 4-1/4"; fold away from scoreline to create card.
2. Use 3/16" Corner Rounder Punch to trim all four corners of Peach Parfait card stock; emboss top 2-1/4" of card with Perfect Polka Dots embossing folder and Big Shot. Adhere to front of card.
3. Use Big Shot and 3" Circle Die to create moon from Very Vanilla; trim to fit into upper left-hand corner of card. Before adhering this piece to card, stamp Tree Limb and Bats images on moon with Basic Black Craft Ink and emboss with Clear Embossing Powder. Adhere moon to card with Sticky Strip (this sticks to the raised polka dots better than SNAIL Adhesive).
4. Adhere striped DSP to bottom 1-3/4" of card.
5. Use Scallop Trim Corner and Border punches to trim edges of black & orange DSP. Set aside.
6. Stamp Happy Halloween image on Naturals Ivory card stock with Basic Black Craft Ink; emboss with Clear Embossing Powder. Color in the letters with Stampin' Write Markers, trim corners with 3/16" Corner Rounder Punch, and adhere to black & orange DSP piece created in Step No. 5 above. Adhere Stampin' Dimensionals to back of DSP and adhere to front of card as shown.
7. Stamp Witch and Cat images on Very Vanilla card stock with Basic Black Craft Ink, and emboss with Clear Embossing Powder. Color Witch image. Cut out both images and adhere to the front of card as shown. I used a Stampin' Dimensional behind each head, and adhered the bottom portions to the DSP with a Two-Way Glue Pen.
Inside:
8. Trim corners of Very Vanilla card stock with 3/16" Corner Rounder Punch.
9. Use Basic Gray Classic Stampin' Pad to ink up Stampin' Around Wheel. Place a piece of scrap paper across top part of card stock and roll design across bottom of card stock. (The vertical dotted lines on this design are longer than what appear on the card; the scrap paper masks the top of the design, so only the part you want to appear actually rolls onto the card stock.)
10. Adhere narrow strip of striped DSP across top of image.
That's it! Time to send out scary cute Halloween greetings!!!!
Cath ;D
No comments:
Post a Comment